Follow Me
Popular Posts
-
A few years ago, I was introduced to the wonderful world of steampunk. If you haven't heard of it before, there are a multitude of re...
-
 I know, I said I might not have anything good for WIP Wednesday due to the slow going on the plarn hobo bag. I would like to add that I man...
 -
 My first question after reading the title would be "What on earth is plarn?" To be honest, I had no idea what plarn was a fe...
 -
Do you know how to knit, crochet, or both? I'm sure you've heard about the amazing website Ravelry , then. If you haven't, let...
-
Happy Labor Day! So, originally, I thought it was only going to be an interview on Tuesday. I spent the entire time from Friday until...


Grab My Button!
Like my blog? Take a button with you. Let your readers know you like to craft something, too!

<div align="center"><a href="http://letscraftsomething.blogger.com" title="Let's Craft Something!" target="_blank"><img src="http://farm4.staticflickr.com/3788/9046676023_899b0f9f44_o.png" alt="Let's Craft Something!" style="border:none;" /></a></div>
Tuesday, January 1, 2013
Duct Tape Top Hat Tutorial
During our last AWA trip, I saw this beautiful top hat that I thought would look amazing on my boyfriend. What I didn't realize, however, was the price. It was a beautiful leather top hat in green and brown. I even made him try it on. In the end, though, it wasn't worth the $250 and we went home without it.

One day, I was skimming through new craft websites, as I am prone to do, and stumbled across Cut Out and Keep. I did a search for steampunk out of curiosity and ran across a tutorial for a Duct Tape steampunk top hat. Her finished product is shown below along with a different version that followed the same pattern:


It's beautiful, but at the same time, it is much too feminine for him. It also used a preexisting top hat, which we didn't have. It mentioned using a plastic party top hat that could be purchased from somewhere like Party City, but I didn't want to make the trip and risk making a hat that was too small for his head. I also didn't like the lines where the Duct Tape began and ended being so visible as it is in the original product.
I did some searching and found a few YouTube tutorials on making a Duct Tape top hat from scratch -- well, Duct Tape. My best find was a Dr. Seuss Cat in the Hat top hat tutorial found here.
After looking through the tutorials and watching the video, I decided it was due time I began. When I finally stopped procrastinating, I got it done in time for Christmas.

If you want your very own Duct Tape top hat, I've included a tutorial. I'm anxious to see how other Duct Tape top hats turn out! To learn how to make your own (or see how I did it) click here.
The Tutorial
Materials:
- Duct Tape -- color doesn't matter. I used plain, silver/gray Duct Tape because I knew I was going to cover it up with paint anyway.
- Tape measure and/or ruler
- Cutting board or a clean, flat surface to cut on
- Xacto knife and/or scissors -- I found that I liked Xacto knives more when working with Duct Tape because the residue from the tape made my scissors nearly impossible to use.
- Marker or pen
- Spray paint
- Acrylic paint
- Hot glue
- Ribbon
- Feathers
- Gears/cogs
- Clock hands
- Metal chain and jump rings
- Charms, etc.
- Wire
- Felt
Construction:
This was the most time consuming and the most difficult part. It shouldn't be that hard if you aren't trying to do it sneakily and surprise your boyfriend with it as a present, though, so don't worry too much. If you want to do it, do it.You are going to take the measurement of your head as the length of your Duct Tape fabric. The height of your fabric will be the height of your hat. I've attached a picture below for reference if this is a little confusing.

For example, the length around my boyfriend's head was 24". I knew I wanted a top hat height of 6.5". My sheet of Duct Tape fabric would be 24" long and 6.5" high, as shown below. Again, please modify this to fit your needs; don't blindly follow my measurements.

I didn't have one of those nice cutting boards with the measurements all done for you, so I allowed a little extra room on my Duct Tape fabric sheet. I would strongly recommend doing this if you don't have a measured cutting board.

Here, I have my sheet of Duct Tape fabric. I gave a little more than 24" on the length just to have a little wiggle room. The ugly edges have about a half an inch on each side that I would trim away.

You can see that I drew the smooth edge that I will cut. It trimmed all the excess tape showing and allowed me to be a little lazier than I should have been in my initial taping. Keep in mind that this is the inside of the hat. I wanted to be sure that I chose the side with the most imperfections to draw the cut lines on.

My nice, clean sheet of Duct Tape fabric that measures approximately 24" long and 6.5" high. Nice clean edges since I trimmed it, but I didn't worry about the raw edges since we would be taping over them shortly.
4. Form a cylinder for the main part of your hat. Try to get it as round as possible. I tried to roll the sheet of fabric a little to get it into a nice circle. Join the edges of your Duct Tape fabric; this should be a clean edge that will have no gaps in it. Line up the top and bottom edge. Cut a peice of Duct Tape an inch or two longer than the height of your hat. (For example, this hat was 6.5" tall, so I cut a strip about 9.5" long.) The overlap helps to secure it a little more. Repeat this process on the inside of the hat.

Remember that marker line that I cut along? Note how it's on the inside of the hat. I worked on forming the best cylinder I could before taping it. I should have rolled it around a little more to help make it more flexible. That's the down side to using two layers of Duct Tape when making the fabric sheet; I sacrificed a little bit of the visual aesthetics to allow for a bit more durability.

And here's my crease. You can hardly even tell it's there -- which is good. It blends in perfectly.

And just to show that I did do a strip on the inside for security's sake. This may not be required even for the added stability, but keep in mind that this is going to be on your head. Taping over that rough edge makes sure any stray tape won't pull your hair!
5. Top off your top hat. Grab your handy-dandy ruler or tape measure again since you made your cylinder. You now have another important number to remember: the diameter of your top hat. Diameter will be how many inches across your top hat. Take your ruler and sit it on the top of your hat and measure. The diameter of this hat was 7.5", so I cut a length of tape about 9". This would give me enough room to overlap and secure the top to the main part of the hat. Take your diameter and add at least 1".
Choose a side to be the top of your top hat. This shouldn't matter much since both sides should be nearly identical. If for some reason you favor one side over the other, go for it, but like I said, it shouldn't be a big deal.
To make the top of our top hats, we're going to be making an asterisk (*), essentially. You'll take one strip of tape and lay it across vertically; the next strip will be horizontal. Shift your hat so that you are repeating this step and no empty space is showing. This will be done for both the inside and outside. I suggest starting with the inside of the hat simply because it won't be seen and allows you a little bit of a learning curve.

You can see the pattern starting to develop. I went vertical, then horizontal, and tilted to make another vertical strip. Be sure that you smooth the tape as you add more layers! I was worried about the strength of just one layer, so I doubled it. There are two bottom layers and two top layers. It seems rather sturdy now.
Here, I discovered that it may not be good to have all those raw edges of tape. I took a few long strips and just covered some of the edges. It doesn't have to be pretty because it's the inside of your hat. What's important here is that it's structurally sound and it won't cause bald spots by pulling out your hair.
Another important note I would like to share at this point is to not pull your hat while making the top. If you pull the hat or reshape it, it will keep that shape. This is why my hat is a little bit wonky and no longer a nice cylinder. Learn from my mistakes.

I flipped my hat over and realized why it was a bad idea to do something like this on carpet -- and let me know I need to vacuum. Oh well. Hopefully this hat will never fall into a cloner. This also gives a good view of my previous point about pulling your hat sides together to make a tighter fit. That's what caused some bunching and gaps that you can see.

Repeat the same process on the outside of the hat, following the same asterisk pattern. You can see here that it took about 8 strips of Duct Tape for me to cover the hat. This will vary depending on your head measurement, more than likely. It's very important that you smooth down any edges here because it is now on the outside of your hat!

I finally got both of my outside layers done. You can see how distorted the top of my top hat is now because of my pulling. Normally I'm a perfectionist, especially in crafted gifts. I didn't beat myself up over the imperfections on this one for some reason. I feel like it only adds a touch of authenticity to the steampunk themed top hat; it doesn't look like it was produced in a factory, but like someone took time and made it by hand. Maybe this will help you cope if you happen to have the same difficulties as I did.

Those rough edges had to go, in my opinion. It was the outside of the hat, so I hated being able to see all that raw Duct Tape edging. I took a long strip of Duct Tape and cut it in half horizontally to make a thinner strip. I just wrapped it around the edges to clean it up a little.
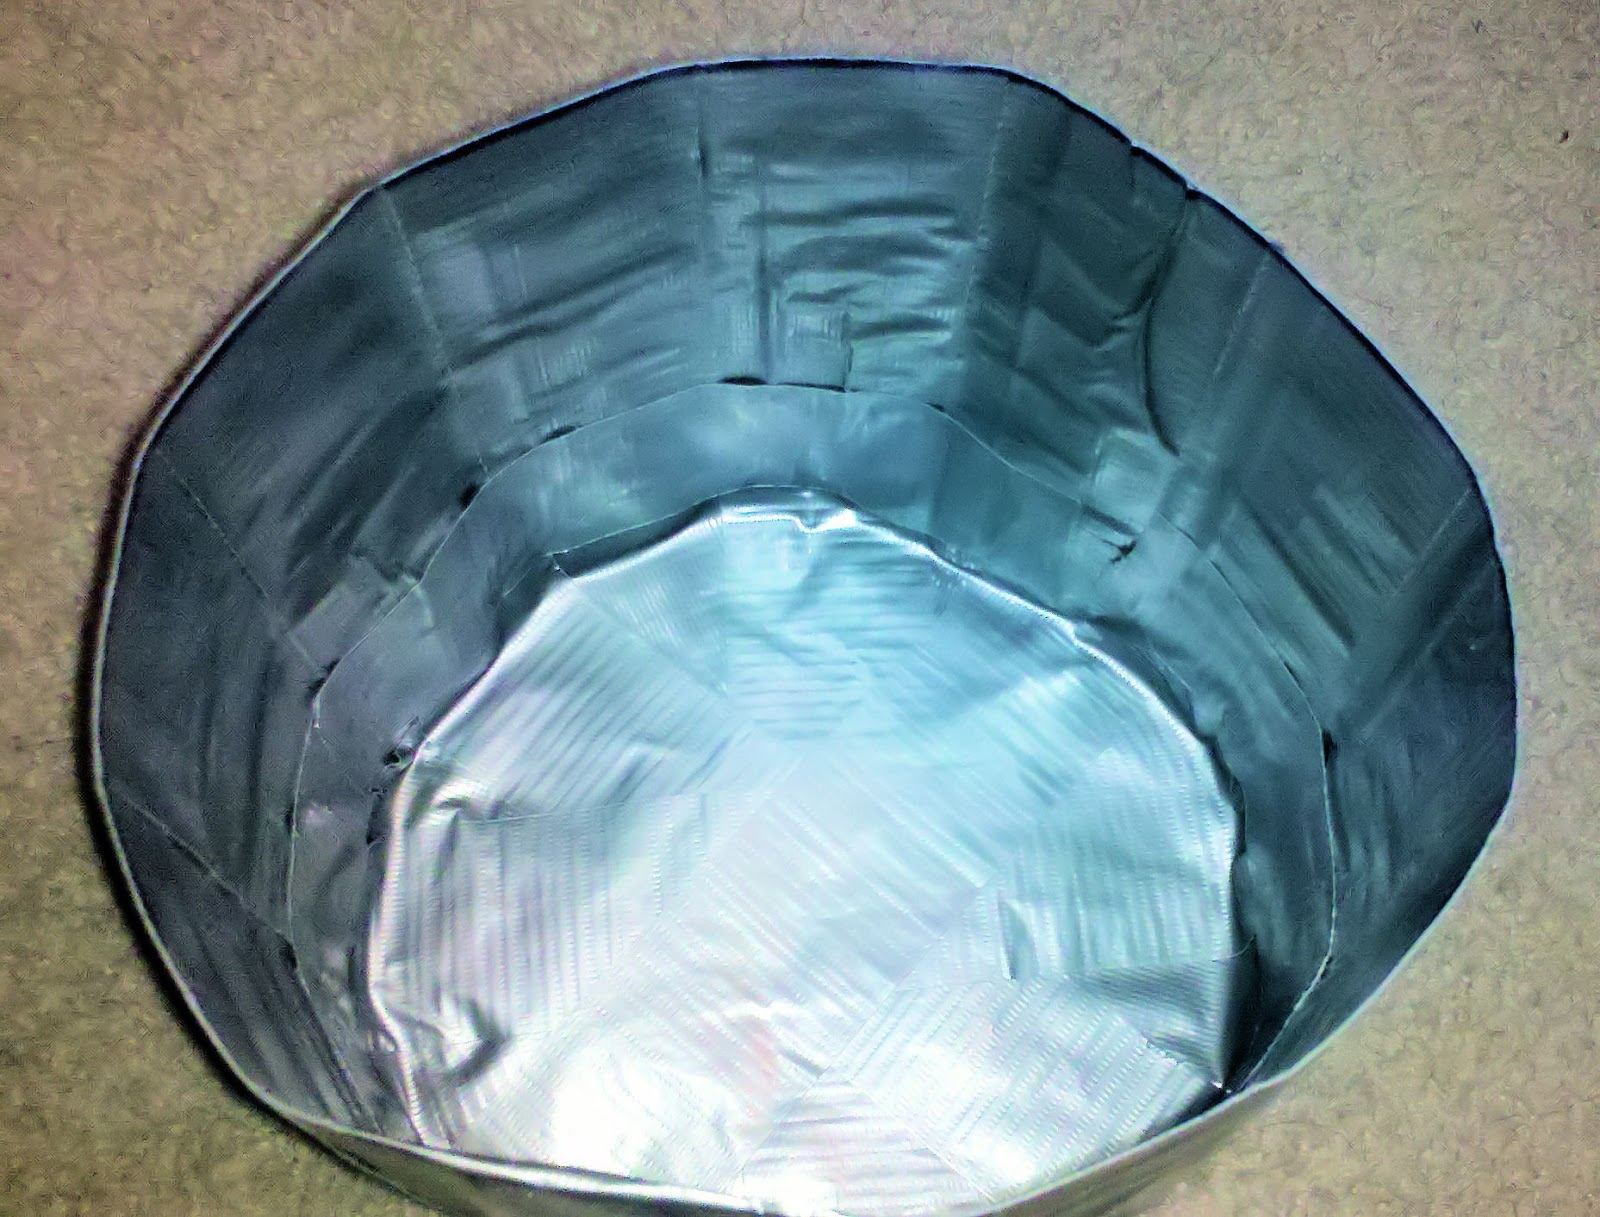
6. Take a break! Mine was kind of forced because I ran out of Duct Tape around this point. Still, I was getting a little frustrated with the entire thing. It's always a good idea to take a break during mini milestones in your crafts. Hopefully, by this point your top hat is starting to take shape! You'll have a large bowl or small, desk garbage can right now. Sit back and look at it, being proud as you realize all that's left is the brim.
7. Measure for the brim. This hat was approximately 7.5" in diameter. Because my odd shape, I measured the widest point; if yours isn't a perfect cylinder, I would suggest doing this and marking your starting point on both the brim and the hat so it will be easy to match up. The diameter of my top hat was 7.5", so I cut a length of Duct Tape that was about 10" inches long. This lets you have about a half of an inch overlap on each side. I wanted to allow myself a little wiggle room, so I went ahead and rounded it up from 9.5" to 10".


Tip: At one point, make a mark on the hat and the brim so that you can match it up in the future. I learned this a little bit too late.
Trace out your hat. It would be ideal if you had something the size of your brim to ensure you get a circle, but I didn't have anything handy. What I did was measure out 2" from about 8 points in my circle and connected them. I think my circle looks pretty good for freehand.
8. Cut out the brim. This step should be pretty obvious. Cut out the outside of your brim, making a large circle. The next step is really up to you. Do you want to keep a Duct Tape circle for some reason? I mean, you could make a sweet Duct Tape throwing star or something. If you want the circle intact, cut a slit in your brim and cut out the circle. This is what I did. Alternately, you can fold the circle in half and cut the circle out that way. Whatever tickles your fancy.

I can't even see where I made the cut in my brim. Once you do, you will want to secure it on both sides with a small strip of Duct Tape!
9. Attach the brim. Hopefully you can figure out how to match up your hat and brim fairly easily. I had a bit of trouble, but I worked it out. You'll need to decide which side you want to work with first. I taped the inside of the hat first so that I could get a feel for the curves.
You will want to tape down opposite sides. This will help to ensure that you don't get a weird lump of extra tape somewhere and realize you've pulled too tightly. That being said, don't pull or stretch your hat at this point. Your tape needs to be secure, but not loose. I did two layers of tape on the inside for security.

Here you can see my tape marks and places where I have added extra tape for either security or comfort. For example, I added a long strip of Duct Tape on the inside from where I had attached the brim. Why? I kept thinking, "What if this gets stuck to his hair. That would huuuurt..."
Once it's nice and taped down, do the same thing for the outside of the brim. For the outside, I tried to be a little more exact. I measured about 2" rectangles of Duct Tape and put three slits on one side to attach it with fewer bubbles. This is something that's personal preference -- I knew I was going to cover my brim here, so I was a little less concerned about it.

After the brim was nice and taped on, I sealed the edge of the brim with halved strips of Duct Tape. I covered the middle of the brim with like pieces, trying to cover as many of the rough edges as possible.
10. Clean up any rough edges and marvel at your top hat. If you see somewhere you'd like to touch up, this is when to do it. Otherwise, sit back and marvel at your hard work. You have a top hat made entirely of Duct Tape. How awesome is that?

If you wanted to make it more like the original picture that I got my inspiration from, she used hot glue at this point to make the weld marks and/or screws. I wanted mine to look more like fabric, so I left this part out.
Painting:
If your goal was just to make a Duct Tape top hat, you're pretty much done now. If you want to try to make it a little bit prettier, feel free to whip out your spray paints and/or acrylic paints. Colors and style is up to you, but I was going for steampunk, so I will share an example of how we do steampunk painting.1. Practice on a scrap piece of Duct Tape. I know, I know. I always read stuff like this and I always write it off like "Psh, testing is for people who don't know what they're doing." Since I didn't know what I as doing and I was giving it as a gift, I thought testing was a good idea.
Why should you test? Well, Duct Tape may not be something that is often spray painted. This means that not all spray paint may stick to the Duct Tape; not only that, but it may dry glossy even if you used matte spray paint -- you don't know. It also gives a good idea of how many coats you will need to thoroughly cover your hat. My spray paint listed a drying time in the temperature range of 60-70 degrees Fahrenheit; I'm crafting in December where it's not exactly that warm. It gave me a good idea of how long it would take to dry.
2. Paint your hat with a base coat. I did about 4 coats on the outside. You may find that yours requires more or less -- this is why the practice piece is important. I wanted to make sure the outside was nicely covered; I could have gotten away with three coats, but when I lifted it up from painting the inside of the hat, I noticed I had pulled a little paint off. On the inside of the hat, I only did two coats to make sure the underside of the brim was covered. It wasn't as big of a deal to me because I knew the underside would be a lot less visible.
I used a glossy black spray paint that I found for cheap at Kmart. I meant to get matte black, but I guess I just picked up glossy on accident. It worked out well, though, especially since my acrylic paints were metallic.


Both of these show the hat after one base coat.


Four coats total on the outside of my hat. Two coats total on the inside of my hat.
3. Paint the accent color first. I use an accent color of silver on most of my steampunk items (such as my Nerf gun).


My silver paint seemed a little thin, which is good because I didn't want it to overwhelm the finished product.

The color doesn't really show up well in the pictures. I feel like it looks a little like Modge Podge or a very thin frosting in the pictures.
4. Paint your main color second. My main color is a metallic antique copper. I used the same methods, painting with my finger in different pressures, speeds, and directions. I also didn't wait for the silver to be completely dry before I began; this is what let it nearly wipe away in places. This could be a good or bad thing for your paint job, but I loved it and thought it added to the worn look, so I didn't fret.

The copper coat was nice and thick. It covered the silver and black, but not completely. I forgot how much I adored this color and how well it applied.

Here is a close up of the strokes and the effects of using your fingers to paint instead of a brush.

5. Repeat these if necessary. I wasn't happy that I could see so much of the black base coat, so I repeated the process with my accent color and chose parts to highlight with my main color. I looked for spots that I thought showed too much of the base coat and did a streak or two of copper with my finger. For the brim, I simply dabbed my finger along it with a somewhat sponge effect, giving it a bit more copper color, but in a much more spotty fashion.

I thought this would hide a bit more of the black base coat, and at the same time, give it a bit more of a fabric feel to the paints rather than a hat made of scrap metal.

6. Don't forget to paint the brim! You would think this would be pretty obvious, but I nearly forgot. I did the same thing for the brim, but since it's less visible than the rest of the hat, I only did one coat of silver and copper.

And here's a close up on the painting effect again.

7. Optional: If you plan on wearing this regularly, I would suggest going over it with a clear overcoat. It may add a bit of sheen to it, so be careful. I haven't tried this, but I thought of it as I was painting the hat.
Additionally, you could pain accents on your hat. I don't feel that I'm a good artist, so I just left that to my embellishments.
Check to make sure that none of the paints affected your tape! Look for any loose flaps and glue them down.
Embellishment:
Again, this is optional. If you do choose to embellish your hat, it's entirely up to you how you do it. I'm going to provide the steps I followed to create my hat. I knew I wanted feathers and the traditional ribbon along the brim. I also chose a few steampunk looking materials from Hobby Lobby.1. Envision your hat. This could be done strictly in your imagination or by holding the embellishments in place. No matter which route you choose, it's a good idea to have the end in mind before you begin gluing things down.
2. Choose your ribbon. I had a pretty old gold ribbon that I had bought for a teddy bear I was making. I thought the color looked a little bit too bright, though, so I attempted to dye it with coffee. It didn't turn out too different, but it took a little bit of the new shine away. (I left the ribbon in the coffee for over 12 hours. I don't know if it was the material or what that didn't want to let the color take, but it didn't.)
I didn't measure the ribbon officially. I wrapped it around the brim of the hat and allowed about an inch of overlap just in case.

The original color of the ribbon. I believe it is called "Old Gold." It still looked a little too new for what I had in mind. I followed the WikiHow link on how to dye something with coffee (I actually improvised a little after reading it, but I wanted to make sure that I had the idea right).

My hot, brewed coffee and my ribbon soaking up some water.

My ribbon soaking in the coffee. I made sure there was enough water that the ribbon wouldn't have to be crammed into the liquid and was able to float freely. I came through every once and a while to stir it and make sure it was evenly soaking.

The end result. Can you tell a difference? I can't, really. Like I said, it might be a little dingier, but not quite as worn as I would have liked. I didn't complain too much, though, because as I held it up to the hat, it still gave a nice contrast without being too harsh.
3. Decide which part of the hat you want to be the front. Why is this important here? Well, you don't want the seam of your ribbon to be in the front of your hat. I didn't want it to be in the front, at least, so I had to pick what I thought would be the best front. This depended on how the tape and the paint looked, so it was difficult for me. Another good deciding factor for if you are making a hat for yourself (or someone else that is expecting it) is to try it on. Sometimes the fit can be what makes the front the front.
4. Hot glue your ribbon onto your hat. Where your seams are should not be the front of your hat. A good place to hide your seams would be under your feathers, so it would be easiest to put your seam to whichever side you want your feathers.

Sure, it's a little bumpy due to the shape of the hat, but I'd rather it be secure than worry about it falling off by only having glue in a few places.

The bumpiness is hardly even noticeable from further away. I love how it contrasted. I kind of wish it was a little wider, but I feel like it would make the hat look shorter. Just a little tip, I had to go back with a little bit of hot glue along a few places toward the top of my ribbon.
5. Place and glue your feathers. I found beautiful black feathers at Hobby Lobby that I thought would would perfectly with this hat's colors. Funny enough, Zach picked out these feathers (although he had no idea what they were being used for).

Unfortunately, I was being a little scatterbrained around this step. I didn't take a picture of the feathers being arranged and glued. I had bought a pack of 3 feathers. You can see the main color is an iridescent black with hints of blue and green in the light. The smaller feathers are pheasant, I think. I staggered them a little where the middle feather was higher; this, I felt, gave a sense of a longer feather. I liked the overall effect. I only put hot glue around the base. I didn't hot glue above the pheasant feathers. I don't know if this could possibly melt the feathers, but I didn't want to risk it.
6. Cover up where the feathers are glued. You have no idea how long I had been eying this little octopus at Hobby Lobby. Every time I went to the jewelery section, I would come up to this little guy, hold him for a minute, and finally realize I couldn't use him for anything, despite wanting to do so. I reluctantly put him back every time, and every time I promised that I'd be back for him. I finally found the perfect place for him!


7. What's more steampunk than gears and clock hands? I know, I know. There's more to it than that. I'm just being silly. But I think my clock turned out beautifully. I made two of these; one is at 3 o'clock and one is at 9 o'clock. I kept the 9 o'clock one for myself and made a hair clip out of it. The only difference in the two is the time.

I had gears left over from making the same teddy bear from before. I layered them an though, "Huh, that looks neat." I took two clock hands and placed them as randomly as I could, although my OCD won out in the end. I glued these together and then remembered the large star-shaped background piece and glued it to the rest. the varying shades of gold worked out very well, in my opinion.
8. Use ALL the clock hands! This wasn't my intention, but it looked great. I have my uncles to thank for this beautiful idea. I was going to use four clock hands along with these alphabet brads to spell out "Rook" in the middles. My uncles started playing with my materials while I was changing clothes and came up with this wonderful idea.

Of course, it was perfectly angled before I picked it up to hot glue all the clock hands down. I find steampunk beauty in its imperfections, though. It make it look more authentic and hand made. The next question was "Where to put it?"

I can't remember which uncle suggested it, but somehow "Put it on top of the hat" came to be. I absolutely loved this idea because it added a funky silhouette to it. I had to be careful where I glued it; I couldn't glue it too high without the hot glue showing on the back.
Another tip: When you're gluing things like this on your hat, hold it up and see about where you want it. Estimate the middle of where the pendant, accessory, etc. will go and mark it on your hat. I didn't do this and mine ended up too close to the feathers, as you can see below. This made the front of my hat look a little more crowded than I had intended.

9. Personalize it! This is the beauty of a handmade, customized accessory like this top hat. I bought scrapbooking brads that had each letter of the alphabet on them. I had the intent of spelling out his steampunk character's name, "Rook", with these brads. Initially, I had planned on using those circular holes in the clock hands, but I loved the shape of the pendant using the hands, so I scrapped that idea. I also had little birds (I know they're sparrows, but let's just call them rooks for added effect) and a jewelery chain that I had intents of using. I had more little knickknacks, but I was running short on time and afraid it would just look thrown together.
I had to figure out how I wanted to spell out Rook. Did I want it horizontal, vertical, slanted? How much space between each letter? Luckily, my uncles are great at figuring stuff like this out. I decided on doing the letters on a slant to add a bit of symmetry with the feathers. One uncle took a sheet of paper, folded it to the shape and length of the feathers, measured the paper, divided it by 4 (letters in "Rook"), and we marked places for my brads to go. To get the brads to go in, I took an Xacto knife to the mark we made and gently poked it through; don't poke it through too much. The brads are small and didn't need much room to go in. I didn't secure the brads right away because I wanted to drape the chain from it.

I didn't measure my jewelery chain. I started from a jump ring threaded through the "R" brad and eyeballed out much of a drape I wanted. When I got to the "O", I simply wrapped the chain around it. If you're worried about the chain moving or falling, feel free to secure with jump rings. I did the same thing for the second "O". I figured out the length of the drape for the "K", cut the chain and attached a jump ring, threading the brads through it. Then I secured each of the brads.
For the birds, I eyeballed a spot between the letters. I didn't want everything to look perfectly measured. I also tried to make each of the birds fly in a different way.
10. Optionally, add felt to the inside of your hat. When I tried the hat on, it left a black streak on my forehead from the paint on the inside of the hat. I don't know why this happened because it probably dried for over a day. Initially, I was going to cut a strip of felt and hot glue it inside to prevent this from happening to Zach and to ensure that the wires from Mr. Octopus didn't stab him in the head. My uncles, however, happened to have adhesive felt and suggested using that instead. If you do go this route, don't worry about if it touches all the way at the top. I would say it would be safe to go about halfway in your hat.
I didn't take a picture of this step because, let's face it, you wouldn't really be able to tell much. "Yep, looks all black inside that hat..."
11. Not optional: Sit back and marvel at your hat (again)! Honestly, I sat and gushed over this thing for a few minutes before we wrapped it up. You put a lot of time and energy into this, you should be proud. I know that I was!

Wrap It Up:
My hat was a gift for my boyfriend for Christmas, so I had to wrap it! We put it in a large Amazon.com box with paper to keep it from getting jostled around. I know he likes to shake presents, so we made sure to put "Fragile" on it and tell him not to shake it.
Be careful when you wrap it -- especially if you have something like my clock pendant on top. When you move the box about to wrap it, be very careful and move it slowly. When we put the paper inside, we made sure to leave the clock hands on the pendant showing so he wouldn't reach down and stab himself (or break the hands off). These are all some things to keep in mind for wrapping.
Unwrap the Surprise:
First, let me explain the silly hat he's wearing already. My grandparents wrapped his gift in 10 different layers of wrapping paper because they know how much he likes unwrapping presents. The last layer was covered in clear packing tape for added difficulty. It kept its shape, so he just put it on his head. That's why it looks so silly...it's not a real hat.

Peeking under the paper. He could see the clock hands, but he was trying to figure out what it was still.

I wish this one wasn't so blurry. It shows the moment of realization on his face. "It's a hat!" I think we joked that he could get rid of his silly Christmas hat now that he had a real one.

Checking out all the sweet little embellishments.

Finally trying it on. It was a little tight on him, but he tilted it to the side some and it fit well. He has it displayed proudly on his dresser until he gets the chance to wear it. I did warn him it was something he couldn't use all the time.
There you have it. A steampunk Duct Tape top hat tutorial made from scratch. I don't know if this tutorial will benefit anyone but myself, but it's out there if anyone needs it. If you run across any problems or questions, feel free to comment and I'll try to help as best I can. If you use it, please link back to me so others can benefit from the tutorial. If you make a top hat, attach a picture in the comments! I'd love to see them!
If you have a suggestion for a craft you would like to see, let me know! I'm always on the look out for more fun crafts.
Happy crafting!
Subscribe to:
Post Comments (Atom)
About Me

Hey. I'm Jeshi and I like to craft all kinds of things. Thanks to the wonders of the internet we DIY-ers can share our processes with others. Want to know more about me? Click here.
4 comments:
Thanks for spelling it out so well, and sharing your mistakes so i won't have to make the same ones( i'll come up with my own i'm sure).
No problem! I had fun with it, even though it was pretty tedious. I'm glad my tutorial could help someone. Be sure you post pictures when you get it done! I'd love to see it.
could you tone down the background a little so we can read the instructions please?
Your background makes your blog very hard to read!!! Maybe you could change it.
Post a Comment