Follow Me
Popular Posts
-
A few years ago, I was introduced to the wonderful world of steampunk. If you haven't heard of it before, there are a multitude of re...
-
 I know, I said I might not have anything good for WIP Wednesday due to the slow going on the plarn hobo bag. I would like to add that I man...
 -
 My first question after reading the title would be "What on earth is plarn?" To be honest, I had no idea what plarn was a fe...
 -
Do you know how to knit, crochet, or both? I'm sure you've heard about the amazing website Ravelry , then. If you haven't, let...
-
Happy Labor Day! So, originally, I thought it was only going to be an interview on Tuesday. I spent the entire time from Friday until...


Grab My Button!
Like my blog? Take a button with you. Let your readers know you like to craft something, too!

<div align="center"><a href="http://letscraftsomething.blogger.com" title="Let's Craft Something!" target="_blank"><img src="http://farm4.staticflickr.com/3788/9046676023_899b0f9f44_o.png" alt="Let's Craft Something!" style="border:none;" /></a></div>
Friday, June 28, 2013
Freebie Friday: What is Organizing without Labels?!

What is organizing without things having labels? I honestly don't know! (Unless you're using all clear containers.) I don't like having to rummage through boxes, storage totes, or what have you to figure out if I even have the right box or not. I like labels.
My problem is that I don't have storage that I feel like I could really use labels on. If you're like me and don't like to spend much, there are several ways that you could make cute storage for cheap -- then label it with its contents!
For example, if you're a sewer -- er, seamstress -- you can always sew pretty storage boxes such as this.

Make It, Love It has a great sewing tutorial...and there's even a window for the label.
If you're a little less nimble with a thimble, you can always use cardboard. There's even the option to cover it with fabric once you've made it. (Don't worry, it's no-sew).

Miss Repurpose shows how to make these pretty fabric covered boxes from cardboard.
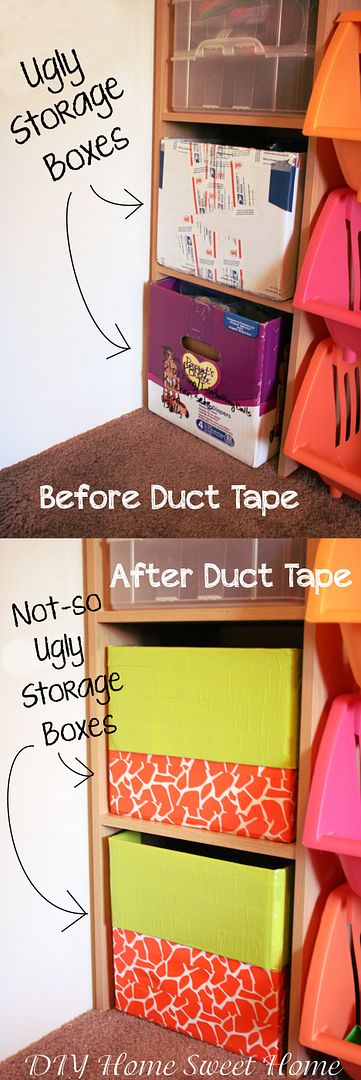
DIY Home Sweet Home covers boxes with Duct Tape to make them pretty.
If you're a fan of mason jars, there are many different ways to turn those into storage.

There are the things I linked in my "Organizing with What You Have" post, where I encouraged you to look around. I have a pencil holder on my desk that I made from an empty oatmeal container.
Use your imagination with storage. It doesn't have to all be uniform. (Unless you're a little OCD like me.)
Once you have your storage created, get some pretty paper and start labeling! Find a template you like for your labels and print the contents on it.
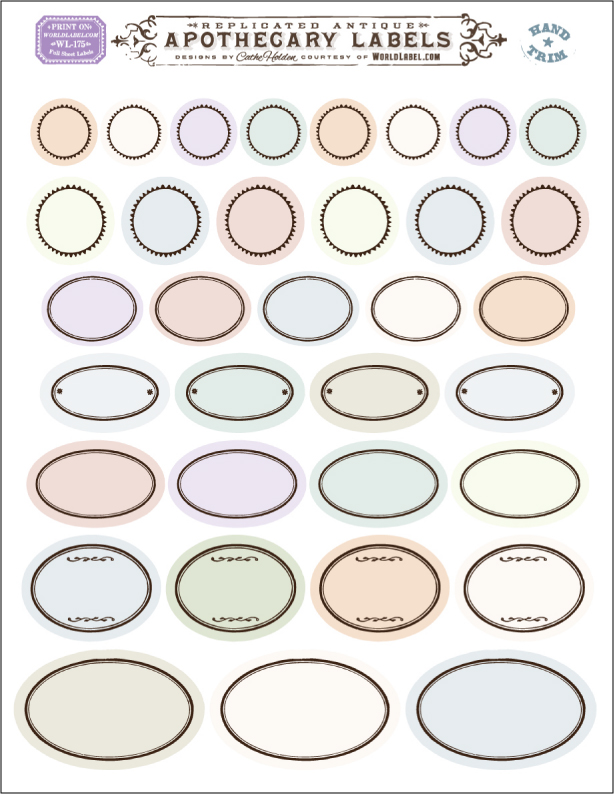
I may be in love with Apothecary Labels...
You could always laminate the label and then write on it so it's erasable. Don't have a laminator? Use clear packing tape; it's been my go-to for years.
Now, you can just paint a little chalkboard paint on there and then change it as the storage does. Don't have chalkboard paint and don't want to shell out for it? You can always make your own!

Rust and Sunshine shared these simple chalkboard labels.

Cheap and simple recipe for your own chalkboard paint from BrightNest.
Now then, go and get label crazy! Do you already use pretty little labels? Which method is your favorite? Send some pictures and show off those labels!


Wednesday, June 26, 2013
WIP Wednesday: DIY Nail Polish Rack, Part One
So I had this aha moment while cleaning up from my closet shelves. This little box seemed to be a strangely familiar size. It took me a bit to realize it was the same size as my bathroom storage shelves. Then, I had the wonderful idea of turning it into a nail polish rack.

I cut the box and made little shelves, fixed them with masking tape and covered the whole thing in layers of Mod Podge, hoping it would seal the tape in, and make the cardboard sturdier. I covered it with a few layers of spray paint, and ta da!
No, not really. The masking tape showed through pretty much no matter what. I tried more layers of paint, sanding it down to help level it out, and nothing seemed to work. So, I scrapped it and started over. I didn't feel too bad tossing it in the recycling bin since it was something I had salvaged anyway.
Take Two:
I noticed these spare pieces of wainscoting that were collecting dust in our garage. They were all left over from when we remodeled our kitchen, so I assumed them to be fair game. The only thing stopping me was that we didn't have a power saw. Thankfully, though, I have a loving boyfriend who does.I drew out a rough sketch of what I wanted, measured them on the board, and Zach was even kind enough to cut them for me. (I guess he was afraid of me losing a finger...) He also suggested that I paint the pieces before I try to assemble it, so I took it home and painted.
Once my layers seemed thick enough to cover the dark mauve color we have in the kitchen, I decided that I was done painting and I could start assembling. I had planned on using wood glue to hold it together, then going back over it with nails or staples. The only thing stopping me now was that we didn't have any wood glue.

I glued the long sides first, and realized that I could match up the lines on the wainscoting lined up great. Not to mention the fact that they are 2" apart, so I can use them for guides for my shelves.
When the glue dried, it was warped and both of the sides were tilted inward.

Take Three:
Whilst browsing YouTube for completely unrelated things, a DIY nail polish rack video showed up on the related videos. "I'll see how they did it," I told myself as I clicked it. It was a pretty good video, actually. She used foam board, which I happened to have two large sheets of from when I was thinking about my World of Warcraft cosplay.I kind of merged two tutorials. I took BluSuga's video tutorial and mixed it with the PaperCastle tutorial for the shelves. What I ended up doing was cutting slits in the sides and shelves so I could make them interlocking. I thought this would make it a little more stable. I took some panel board nails and reinforced them on the sides, then hot glued another side strip over it, just to make sure. I took it out and spray painted it white just to cover any imperfections.

Right now, I have the frame with it's rough foam board edges. I wanted to wait to make sure everything was glued and that I liked it before I cut the back. Once I get it done, I thought about doing a pink and white chevron design on it for just a pop of color since it will be against a white surface. I'm also going to add some white dowels to the front just to make sure the polishes don't slip out. I also plan on covering those rough edges with some ribbon that I picked up.

That's my WIP right now. Well, one of them at least. Hopefully this will be done soon and I can share with you it's awesome glory!
Monday, June 24, 2013
Musing Mondays: Quick Organizing Recap and Product Reviews
June is nearly done and thankfully, so is my organizing spree of my room. I can't think of much more that could be organized by this point (thank goodness). I mean, of course I could find more stuff to organize, but the large projects are done, which is a great relief.
I thought that I might do a post that was rating my new organizing systems and/or the products that I used to organize.
Closet
Shelving Organizer:

See my blog post here for how I installed and use this organizer.
Price: This ClosetMaid shelving organizer was $89. All basic parts were included. The price of doing this yourself is around $120.
Assembly: It was super easy to install. It came with instructions for 4, 5, and 6 foot closets. Each dimension had about four different configurations with instructions. The instructions also included for drywall or cement. It used very little tools; the only thing I had to cut was one of those tracks at the top.
Notes: I liked the versatility that came with it. I had very few leftover parts, which makes me feel like I didn't overpay for the two extra feet of closet space that I don't have. I've only had it a month, but I've had no problems with it. I was leery of the hanging shelf rods at first, but I've grown fond of them; I have no problem with clothes falling off the edges.


Overall Rating: Because I haven't been able to see how it does over time, I rate it at a 4/5 stars.
"Hanging" Shelves:

See my blog post here for how I installed and use this organizer.
Price: I got my hanging shelf organizer for $6 at a dollar store.
Assembly: No assembly was required for use as-is, but I wanted to stored horizontally. I added supports made from plastic hangers. This added an additional $1.50 to the total price. Cutting these was easy and they are just sitting in there.
Notes: This fixed my top-shelf storage easily. It holds all my sweaters and keeps them nicely organized. I don't have to worry about them all falling if I want a sweater. I haven't had it through the winter, so I'm less sure of how well it will hold up with constant use.
Overall Rating: Again, because I haven't seen how it holds up over time, I'm giving this a 4/5 stars. A good cheap, easy solution.
Bathroom
Over-The-Toilet Organizer:

Price: I believe this was around $50, but I got it a few years ago from Walmart.
Assembly: Oh my god. This assembly was terrible, but I think that was mostly due to the fact that our box -- which was unopened, I might add -- lacked assembly instructions. It took mom and me a few hours to assemble this with the help of a few margaritas and intuition. It hasn't fallen apart, so I guess it's put together correctly. I emailed the company about there being no instructions and they replied a few days later (it was apparently bought during the weekend) with a PDF of the manual. Good guy company tries to make up for their errors, so I have to give them props for that.
Notes: If your box has assembly instructions, it's a pretty good product. I have a bathroom probably about the same size as my closet, so again, I need all the space I can get in there. I would also recommend NOT screwing in that bottom panel toward the floor before you get this thing over your toilet. Learned that the hard way...
Overall Rating: Just because of the difficulty of assembly, I'm giving this a 4/5. I know, they couldn't help it and they did what they could to make up for their errors.
Decorative Hair Accessory Organizer:

Price: $2 or so. The basket at the top was in a junk room, the glasses on the top shelf were from candles, the black baskets on the bottom shelf were bought at a dollar store in packs of two, I believe. Can't beat that price. :)
Assembly: None required. I just went through things that I didn't use as much and put them in the top basket, cleaned the candle holders before storing hair accessories in there, and the baskets kind of happened on their own. (First is things I use most often, second is hair accessories, third is a combination of hair products and makeup, and last is facial cleaning things.)
Notes: Easy fix with minimal cost. Check out the related blog post for some more solutions like this. I know, I shouldn't technically review this since I hadn't purchased anything for it, but I'm still pretty in love with those glass candle holders as storage!
Overall Rating: You can't beat cheap, effective, and pretty in my opinion. Not to mention it's easy because you know where everything goes.
Bedroom
Nightstand:

Price: The lamp was $6 from Family Dollar.
Assembly: I didn't have to assemble anything -- even the nightstand when I bought it. Instead, I used a shoe box as an organizer for remotes, glasses case, and things I might need more handy during the night. (Minds out of the gutter, please. I meant like a flashlight.)
Notes: I know, again not a real product review, but I was having a really hard time with just knowing my nightstand was a cluttered mess. Now it's nice, neat, and organized -- plus I have a handy spot for my blankets for when I get cold.
Overall Rating: I'm giving the shoe box drawer organizer a 5/5 because it's cheap, easy, and effective. I even used the lid for some of the bulkier items that I kept in there! Effective and efficient.
Shoe Storage:

Notes: I like that it's horizontal, breathable, and zips closed, but it's awfully flimsy. I understand that it's intended for under the bed use, but it's so floppy it didn't want to slide under there. I found a way around it because I had a large white board that I was storing under the bed which I just used as a base for it. Also, the dividers aren't fixed to the bottom of the organizer. I understand the point of this being for higher heels, but in my struggle to slide this under the bed, some of my shoes slid out of their compartment and into the next.

Overall Rating: While it does get the job done and my shoes are stored nicely out-of-sight, I would opt for something a little more sturdy. If you have carpet, I would suggest getting a piece of cardboard or something to place underneath it to make it easier to slide.
Yarn Storage:

Price: I got my organizer for $5 at Walmart.
Notes: I had seen something like this somewhere on the internet (probably Pinterest or one of the crafting websites I've seen lately) and thought it was an amazing idea. I don't have that much yarn yet, but I thought it could be a good place to keep craft items in general. My only issue with the yarn is some of the bulkier skeins don't fit so well, but with a little squeezing, it's possible. Not to mention, if you take the labels off of the yarn and get one of the clear plastic organizers, it makes the back of your door nice and pretty -- plus your yarn is out-of-sight!
Overall Rating: I think the pros easily outweigh the cons here and it makes for a pretty organizer behind closed doors. I'm not sure what all will fit in there just yet, but I'll test some things out.
All of that being said and done, Zach and I celebrate our seven year anniversary this Thursday! I'm pretty sure that I got him the best gift ever and I'll be sure to post it, but I want to wait and not spoil the surprise.
Let me also just quickly mention that I don't know what to do now that Game of Thrones is between seasons. I mean, I have to finish the books but, but... The feels!
Subscribe to:
Posts (Atom)
About Me

Hey. I'm Jeshi and I like to craft all kinds of things. Thanks to the wonders of the internet we DIY-ers can share our processes with others. Want to know more about me? Click here.