Popular Posts
-
A few years ago, I was introduced to the wonderful world of steampunk. If you haven't heard of it before, there are a multitude of re...
-
I know, I said I might not have anything good for WIP Wednesday due to the slow going on the plarn hobo bag. I would like to add that I man...
-
My first question after reading the title would be "What on earth is plarn?" To be honest, I had no idea what plarn was a fe...
-
Do you know how to knit, crochet, or both? I'm sure you've heard about the amazing website Ravelry , then. If you haven't, let...
-
Happy Labor Day! So, originally, I thought it was only going to be an interview on Tuesday. I spent the entire time from Friday until...
Grab My Button!
Like my blog? Take a button with you. Let your readers know you like to craft something, too!


<div align="center"><a href="http://letscraftsomething.blogger.com" title="Let's Craft Something!" target="_blank"><img src="http://farm4.staticflickr.com/3788/9046676023_899b0f9f44_o.png" alt="Let's Craft Something!" style="border:none;" /></a></div>
Followers
Powered by Blogger.
Wednesday, May 22, 2013
WIP Wednesday: Expeimenting with Plastic Bag Fusing
I know, I said I might not have anything good for WIP Wednesday due to the slow going on the plarn hobo bag. I would like to add that I managed to get a good deal done the other day while Zach was helping his brother with math. I'm about halfway done with the bulk of the bag, but it's really just double crocheting and doesn't look very impressive...yet.
So, I decided instead of posting some inspiration, I would actually try something I've been thinking about. When I first learned about plastic bag fusing, I was like "Okay, but what about if I wanted to add color to it? Can I dye the plastic in any way?" Honestly, the only places we have around here use either white or yellow bags. (Yay small towns!) Unless I want white, yellow, or black garbage bags, I need to figure out how to dye them.
I did a little Googling, but nothing was really helpful. Most things just said it was much easier to do using a bag that already had that color. Well, that didn't help at all. Someone had suggested spray painting, and at first I was completely against it. Then, as my search dwindled on, I thought that maybe, if you fused some plastic bags together, spray painted it, and then added more plastic over it to kind of seal the spray paint in, it may work.
I decided that it was worth a shot and grabbed the bag full of scraps from making plarn. I didn't want to use up all of my good, hole-less bags that I would use for my plarn on a theory, so I figured scraps would do just fine.
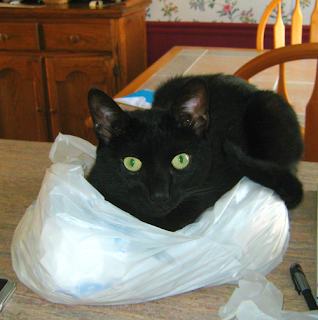
I had my handy little helper with me because he absolutely loves plastic Walmart bags.
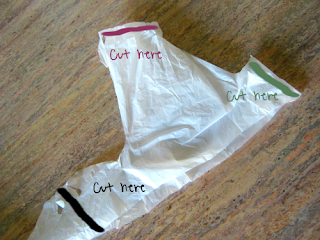
I used the handles since they were the biggest sections of bag that I had to work with. I cut them at the seams and down the center so I would have two large sections per bag. I just wanted to make something large enough that if it worked well, it wouldn't just be a fluke.
And I was left with four, thin, silly top hat looking pieces of bags. I knew they were going to be thin and probably not much stronger than regular bags if I didn't layer them. I cut about three bags like this so that I would have twelve thin pieces like this.
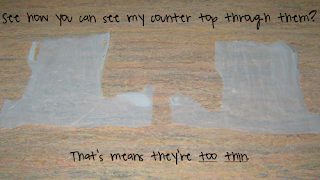
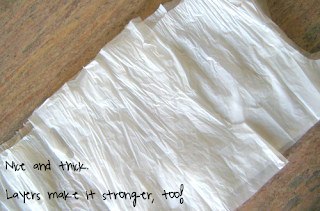
I took these pieces and layered them until I could not see the pattern of my counter through them. About twelve worked for me (3 bag handles total). Ever had a plastic bag break on you? Yeah, me too. That's another reason why layers are great -- more layers means it's stronger.
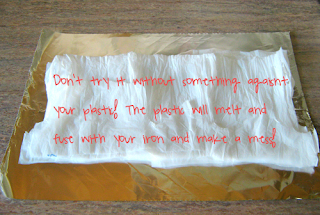
According to the internet, you can use aluminum foil or parchment paper to sandwich your plastic bags between. Since I'm cheap, I thought I would use aluminum foil for this run. It's just a small swatch I'm testing and parchment paper is more expensive.
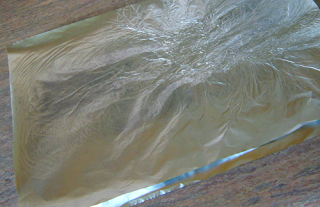
The biggest drawback to using aluminum foil is that you can't see the plastic as it's fusing. If you were actually making something with fused plastic, I would recommend using parchment paper so that you don't have to keep lifting the foil. I ironed for about ten minutes, flipping the foil about every two minutes. I used the second lowest setting on my iron; on this setting, the aluminum foil never got too hot to touch to flip it over.
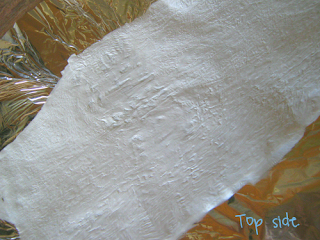
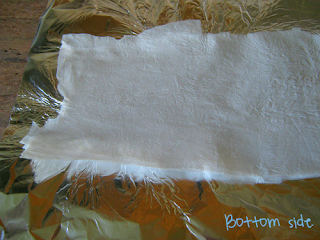
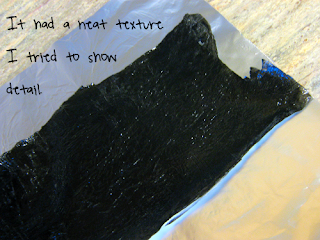
Everything I read said that bubbling is normal and that one side would look better than the other; it was also said that edges don't fuse well. I noticed all of these things with my first trail run. To me, the bottom side looked better and was less shiny. I found it neat that you couldn't see any of the seams or places where it overlapped unless I held it up to the light.
Then I took it out to the garage for a spray painting -- well, actually two of them as I did two coats. The only dark color I had happened to be black. I thought we had a dark purple, but I was wrong. I know, I know... If I wanted a black bag, I could use a trash bag. I was just testing things, remember!
Now, what I thought would be wrong with using spray paint would be that it might dry and crack if you were to make anything out of it. This is where I had the idea of using another bag or two to seal the spray paint inside of the layers.
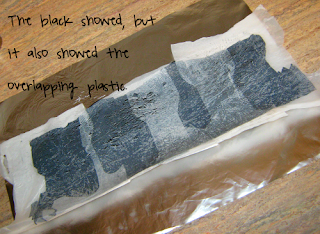
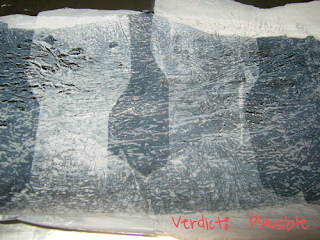
So, I layered one more thin layer of plastic over it to try to seal it in. Unfortunately, all I had were white Walmart bags. Since I was just trying to test a theory, I didn't worry too much about the overlap; it was just another part of the test. Turns out, the overlap is very obvious. If you were to patch them carefully together, it would just look like a lighter version of the color you painted.
What's the verdict on this method of "dying" plastic bags? I'd say it's plausible. You have to be very, very careful with this method if you're going for a dark color. I don't think it would matter as much on lighter colors. Otherwise, try clear plastic bags for the top, outer layer.
Do you guys have any suggestions for how to dye plastic bags for fusing? Maybe I'll try again with something different sandwiched between the plastic. Hmm. Wait, no. First I have to finish my plarn hobo bag!



Labels:
fused plastic,
plastic bags,
WIP Wednesday
Subscribe to:
Post Comments (Atom)
ShareThis
About Me

Hey. I'm Jeshi and I like to craft all kinds of things. Thanks to the wonders of the internet we DIY-ers can share our processes with others. Want to know more about me? Click here.
Blog Archive
-
2013
(49)
- September(5)
- August(7)
- July(14)
- June(12)
-
May(9)
- Freebie Friday: Tons and Tons of Knitting and Cro...
- WIP Wednesday: More of a Theory than an Actual WIP
- Musing Mondays: New Phone and More!
- Freebie Friday: Turn Your Phone into a Projector!
- WIP Wednesday: Expeimenting with Plastic Bag Fusing
- Musing Mondays: What Has Me Distracted
- Freebie Friday: Tons of Free Fonts!
- WIP Wednesday: Crochet Plarn Hobo Bag
- Incoming Blogger!
- January(2)
- 2012 (1)
Labels
adulthood
(5)
anniversary
(1)
assemble
(1)
AWA
(5)
bathroom
(2)
birthday
(1)
birthdays
(2)
blog
(2)
bonus lemur
(1)
bookcase
(1)
build
(1)
cake
(2)
cardboard
(1)
cat
(1)
chalkboard
(1)
cheap
(4)
chicken wire
(1)
clay
(4)
closet
(6)
collage
(1)
concept
(1)
cooking
(1)
corset
(1)
cosplay
(6)
costume
(9)
crochet
(3)
diet
(2)
distractions
(4)
DIY
(6)
dog
(1)
dollar store
(2)
dough
(3)
download
(3)
duct tape
(1)
editing
(1)
exercise
(1)
fabric
(2)
foam board
(2)
fonts
(1)
food
(2)
frame
(1)
free
(1)
Freebie Friday
(13)
fused plastic
(1)
gift
(1)
gifts
(1)
gimp
(1)
hair
(1)
handwriting
(1)
Harry Potter
(1)
headpiece
(4)
holidays
(1)
hot glue
(3)
interview
(5)
introduction
(1)
jetpack
(1)
jewelery
(1)
job
(5)
June
(1)
Junk-Free June
(10)
knit
(1)
label
(1)
lace
(1)
link
(1)
love
(1)
Mod Podge
(1)
movie review
(1)
Musing Monday
(15)
nail polish
(5)
no-sew
(1)
online image editor
(1)
oops I did it again
(2)
organization
(8)
organizer
(2)
paint
(5)
party
(3)
pattern
(1)
pets
(2)
photos
(1)
picmonkey
(2)
Pinspiration
(2)
pinterest
(3)
planner
(2)
plarn
(2)
plaster
(1)
plastic bags
(2)
poo free
(2)
porcelain
(1)
printable
(2)
programs
(1)
projector
(1)
quiver
(1)
quote
(1)
recipe
(1)
recycle
(3)
reflection
(1)
remodel
(3)
revamp
(2)
review
(1)
room
(1)
sculpt
(5)
sew
(1)
sewing
(4)
shampoo
(2)
shelves
(3)
shoes
(2)
smartphone
(2)
spray paint
(2)
starfish
(4)
steampunk
(6)
Steamunk September
(1)
storage
(2)
t-shirt
(1)
tips and tricks
(1)
to-do
(2)
top hat
(1)
transfer
(1)
tutorial
(2)
tutorials
(1)
upcoming project
(2)
upcycle
(4)
update
(16)
vacation
(1)
website
(1)
WIP Wednesday
(15)
wood
(1)
wrapping paper
(1)
Other Great Blogs
Let me know if you would like me to share your button here!



1 comments:
I enjoyed what I could read of your site/blog. It was VERY hard to read due to "busy" background and light print.
Post a Comment