Follow Me


Popular Posts
-
A few years ago, I was introduced to the wonderful world of steampunk. If you haven't heard of it before, there are a multitude of re...
-
 I know, I said I might not have anything good for WIP Wednesday due to the slow going on the plarn hobo bag. I would like to add that I man...
 -
 My first question after reading the title would be "What on earth is plarn?" To be honest, I had no idea what plarn was a fe...
 -
Do you know how to knit, crochet, or both? I'm sure you've heard about the amazing website Ravelry , then. If you haven't, let...
-
Happy Labor Day! So, originally, I thought it was only going to be an interview on Tuesday. I spent the entire time from Friday until...


Grab My Button!
Like my blog? Take a button with you. Let your readers know you like to craft something, too!

<div align="center"><a href="http://letscraftsomething.blogger.com" title="Let's Craft Something!" target="_blank"><img src="http://farm4.staticflickr.com/3788/9046676023_899b0f9f44_o.png" alt="Let's Craft Something!" style="border:none;" /></a></div>
Showing posts with label AWA. Show all posts
Showing posts with label AWA. Show all posts
Wednesday, September 11, 2013
WIP Wednesday: Everyday I'm Bustling

Alright, I know I promised a new theme and here it is: Steampunk September! While I suppose I should have been using it on my starfi -- wait, I can say it now -- Staryu headpiece, I didn't want to use it before September began.
Steampunk September is named as such because of our upcoming anime convention. Instead of dressing as traditional anime characters or the like, we enjoy steampunking. It's the one weekend a year I get to lace up in my corset without people pestering me with questions about it hurting/being uncomfortable/etc. (By the way, corsets are not uncomfortable to me; in fact, they help my posture and my back.) Also, I rather enjoy alliteration.
That being said, I began sewing this week. I found a full sized bed sheet in this pretty buttery color. It was $1.95 at a thrift shop. It wasn't until I got it home, however, that I noticed a large splotch of yellow marker on it, too. It kind of made me wonder if the sheet was originally yellow, but whatever.
The yellow sheet was made into a full-length skirt; I used elastic for the waist band because it would be hidden underneath my corset. I want to make another skirt in blue to go on top of it. The blue skirt would be bustled.

I thought that the hem of the sheet itself would be great for the hem of the skirt; I wouldn't even have to do anything to it!

Then, I noticed that if I doubled it over, the elastic for the waist would fit inside well, so I decided to use it as my waistband instead. I doubled it over, sewed it together, and sewed a top stitch to make a little channel for the elastic.

For my bottom hem, I rolled it up about a centimeter, ironed it to make a little pleat, then rolled it up another centimeter for a small hem. The stitch is along the top of the hem.

I won't bore you with all the details; it's a simple, two panel skirt. If anyone needs help with figuring out how to do one, I'd happily help. It's a freaking rectangle, after all, but i wanted it to be long and rather straight.

Here is a close-up of my elastic channel. You can see the stitches where the bed sheet was orignally hemmed. If it were something that would show, I would take a darker thread (or maybe even white) and sew some zig-zags between the two hems at the bottom for decoration.

Of course, I can't do anything without at least a little help from this Booger. He worked well in weighting my fabric down so I could pin it.
This idea is for my Steampunk Misty cosplay. I'm not that into showing off my legs, and there is no way I would be seen in public wearing a belly shirt and short shorts. Sorry. So, when I thought of steampunking her, I envisioned the yellow of her belly shirt, the blue of her shorts, and the red of her suspenders. I knew there were also different version of her outfits throughout the series.

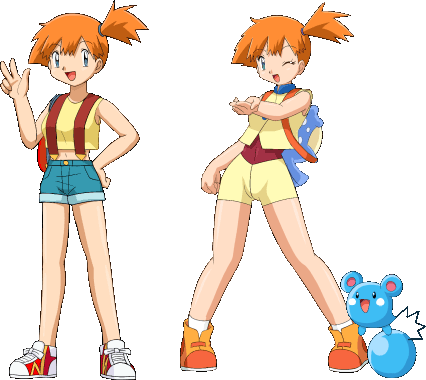
In case you are unfamiliar with Pokemon, here are some images of Misty throughout the games and anime.
The yellow color is not only representative of the shirt, but it is also close enough a skin tone that it could also represent skin. The blue bustle is obviously representative of her short shorts. My corset is red, which is for her suspenders. This is for the middle Misty, which is from the anime. It could just as easily be for the Misty on the right.
I am also considering making a jacket for this ensemble, though I haven't decided the color. Any suggestions?
Also, I have been toying around with the idea of dying the yellow either with tea or brown dye just to darken it up a little. It seems pretty buttery and bright to me. What do you think?
I know some of this is hard to envision because all you have to go by is the bed sheet skirt, but it will come together! I promise!


Wednesday, September 4, 2013
WIP Wednesdays: Starfish Wrap-Up
I know you have to be so tired of hearing about this stupid starfish headpiece by now! There is good news, though: I'm practically finished with him!


In case you've been living under a rock since 1995, this is Staryu. He's one of the original 151 Pokemon, so I guess to be fair, I should say "unless you've been living under a rock since 1995 OR you hopped on the Pokemon bandwagon after the first few generations." Staryu's gem doesn't seem as bright in this picture, but you can see the weird little gem holder thong that he does have. (I've checked other angles -- it's only around one leg.) I also changed the coloration to look a little more realistic, such as trying to make him look more porous like an actual starfish.

I finally hot glued his gem and holder to his body, which is a huge relief for me. I was afraid of losing parts of him. I also cut out a star from some stiff felt and hot glued it as a backing. All I lack is gluing on the clips to keep him in my hair.

Even though I have yet to wear him, I love him. I've put a lot of time and effort into him and tried to correct as many imperfections as I could, though some were not avoidable. At least they are hardly noticeable from personal-space-distance.
After my interview yesterday, I thought long and hard about going to get a cupcake as a reward. I managed to calm myself and decided to go to Thrift Mart instead. Instead of gaining calories, I lost them walking around. Take that, fat.
I also gained a pair of pants, shirt, large skirt that I will need to take in, and a very large bed sheet that I can use for sewing my skirt. I was looking for a yellowish color and this color is nearly what I was looking for. For $2, I think I can spend some time aging it to make it a little less bright. (I tried to take a picture, but the brightness just was not coming through.)
Just a heads-up for what's coming next.

Source, along with a game!
That's right, he's a Pokemon. If that isn't enough of a hint, I made a Staryu, who is one of Misty's main Pokemon. I'm not planning on doing a traditional Misty because that would look absolutely horrible on me; as I've said, we are doing steampunk trainers.


I finally hot glued his gem and holder to his body, which is a huge relief for me. I was afraid of losing parts of him. I also cut out a star from some stiff felt and hot glued it as a backing. All I lack is gluing on the clips to keep him in my hair.

Even though I have yet to wear him, I love him. I've put a lot of time and effort into him and tried to correct as many imperfections as I could, though some were not avoidable. At least they are hardly noticeable from personal-space-distance.
**********
After my interview yesterday, I thought long and hard about going to get a cupcake as a reward. I managed to calm myself and decided to go to Thrift Mart instead. Instead of gaining calories, I lost them walking around. Take that, fat.
I also gained a pair of pants, shirt, large skirt that I will need to take in, and a very large bed sheet that I can use for sewing my skirt. I was looking for a yellowish color and this color is nearly what I was looking for. For $2, I think I can spend some time aging it to make it a little less bright. (I tried to take a picture, but the brightness just was not coming through.)
Just a heads-up for what's coming next.
Wednesday, August 21, 2013
WIP Wednesday: More of the Starfish
How much longer can I drag this stupid little starfish out, right? Well, I'm almost done with him. He's practically down to the tiny little details now that don't even have to be included. I know I haven't done much with him since we last saw each other, but I've really been brainstorming my last minute costume ideas. That's right, our convention is in a little over a month and I have no new costumes. Poops. That means I really have to get to work in this next month!

This is how we last saw this little guy, right? Oh wow, that makes me feel like I've done so little... I made the gem casing, which took longer than expected because I had to let it air-dry, along with those two little leg spoke things. Then, to my mortification, I could not get the gem out. After a little gentle prodding with a toothpick, it wiggled out.
I painted the gem casing and those little leg spoke things on it as close to a golden color as I could get. It looks a little more buttery than golden, but I feel like the color works a little better with a steampunk flare to it. The casing and the little spoke things dried together, which is a relief for me, but I'm still going to hot glue them both down...just to be sure.
I pulled the gem off. Turns out my super glue wasn't really that super. I decided I'll hot glue it when I reattach it. I liked the color of it, but knowing it was supposed to be a gem and that it was pretty matte, I had a brilliant idea. I grabbed a some nail polish a shade deeper and put a few coats on it. Now it's pretty and super shiny. I feel like it looks a lot more like a gem now. I thought about adding flecks of glitter to it, but I thought that would be a little much.
Thinking back, I probably could have used one of those little glass half-marble things. I got some for mom a few years back to help decorate her bathroom, so I even have it in that dark red color. Oh well, it would have probably shown the colors underneath anyway.
Just to be safe, I covered the starfish body with a matte finishing coat, which I had stolen from Zach. I could have probably skipped this step, but I'm pretty paranoid about him getting messed up. After I got the gem casing the color I wanted and let it dry, I covered it with the matte finishing, too.
Now, it's down to the hot gluing and putting this bad boy together! Since I made it all in different steps and let things dry in between, I was able to build each piece around one another. This way, all of my pieces fit together perfectly.

All I have left are some minor details. I had considered putting a little bit of felt on the back on it to make it a little nicer. I also thought that might make the hair clip stay on it better. I had also played around with attaching pearls to it, but I haven't quite decided. Thoughts, opinions, or constructive criticism?
Have you figured it out yet? Since he's done, leave your ideas on who/what it is in the comments and I'll reveal it on Monday.

This is how we last saw this little guy, right? Oh wow, that makes me feel like I've done so little... I made the gem casing, which took longer than expected because I had to let it air-dry, along with those two little leg spoke things. Then, to my mortification, I could not get the gem out. After a little gentle prodding with a toothpick, it wiggled out.
I painted the gem casing and those little leg spoke things on it as close to a golden color as I could get. It looks a little more buttery than golden, but I feel like the color works a little better with a steampunk flare to it. The casing and the little spoke things dried together, which is a relief for me, but I'm still going to hot glue them both down...just to be sure.
I pulled the gem off. Turns out my super glue wasn't really that super. I decided I'll hot glue it when I reattach it. I liked the color of it, but knowing it was supposed to be a gem and that it was pretty matte, I had a brilliant idea. I grabbed a some nail polish a shade deeper and put a few coats on it. Now it's pretty and super shiny. I feel like it looks a lot more like a gem now. I thought about adding flecks of glitter to it, but I thought that would be a little much.
Thinking back, I probably could have used one of those little glass half-marble things. I got some for mom a few years back to help decorate her bathroom, so I even have it in that dark red color. Oh well, it would have probably shown the colors underneath anyway.
Just to be safe, I covered the starfish body with a matte finishing coat, which I had stolen from Zach. I could have probably skipped this step, but I'm pretty paranoid about him getting messed up. After I got the gem casing the color I wanted and let it dry, I covered it with the matte finishing, too.
Now, it's down to the hot gluing and putting this bad boy together! Since I made it all in different steps and let things dry in between, I was able to build each piece around one another. This way, all of my pieces fit together perfectly.

All I have left are some minor details. I had considered putting a little bit of felt on the back on it to make it a little nicer. I also thought that might make the hair clip stay on it better. I had also played around with attaching pearls to it, but I haven't quite decided. Thoughts, opinions, or constructive criticism?
Have you figured it out yet? Since he's done, leave your ideas on who/what it is in the comments and I'll reveal it on Monday.
Wednesday, July 31, 2013
WIP Wednesday: More Headpiece!
Hey, look at that. I'm adding a little more to the headpiece. I do mean a little. It's a tedious process working with clay. It may not be to you, but to me it is. I'm always a little more cautious than I probably have to be, but I really don't want him to break.

I sprayed some nonstick cooking spray on him to make sure my little clay ball didn't stick to him. I shaped a half circle in the little indention, scooped it out, and baked him.
Once he was baked, I put a coat of red on it. (All around, bottom and everything. I didn't want to risk it showing.)
I took some super glue and glued him in place. Ta-da! A starfish with a gem-like-thing. I debated on adding glitter to make it a little more shiny, but I think that I'll go over it with a clear coat of nail polish in the end for that shiny effect.
 After that came the really tedious part. I say really tedious because I don't know how to do this part without letting the bits air-dry. I have to do a circle around the gem, and two little legs that go between the legs of the starfish. I tried doing this all in one piece, but I just couldn't see it happening.
I did the two little legs of the gem holder by themselves, but with the rest of it already baked, I was afraid to put it in the oven. I would cry so hard if it shattered right now. So my little legs are currently air-drying. Once they're dry, I'll add the circular part of the gem holder.
Is it starting to come together yet? And clues on what it is? I hope so. I can really see it now that I have the gem in place! (There again, I know what the end result is, so I guess that's kind of cheating.)
Alright, so this is something else I'm working on starting for myself: meal planning. Zach and I have been saying we were going to lose weight for far too long and I really want to force myself to get motivated and do it. So, I'm trying to find a way to make a weekly meal plan for myself, but it's proving to be pretty hard to do.
Do you guys do this? Have any tips for me?

When we left off last week, he was about like this.
I sprayed some nonstick cooking spray on him to make sure my little clay ball didn't stick to him. I shaped a half circle in the little indention, scooped it out, and baked him.
Once he was baked, I put a coat of red on it. (All around, bottom and everything. I didn't want to risk it showing.)
I took some super glue and glued him in place. Ta-da! A starfish with a gem-like-thing. I debated on adding glitter to make it a little more shiny, but I think that I'll go over it with a clear coat of nail polish in the end for that shiny effect.
I did the two little legs of the gem holder by themselves, but with the rest of it already baked, I was afraid to put it in the oven. I would cry so hard if it shattered right now. So my little legs are currently air-drying. Once they're dry, I'll add the circular part of the gem holder.
Is it starting to come together yet? And clues on what it is? I hope so. I can really see it now that I have the gem in place! (There again, I know what the end result is, so I guess that's kind of cheating.)
********
Do you guys do this? Have any tips for me?
Monday, July 15, 2013
Musing Monday: Small Blog Update, Costuming Hints, Distractions, & Tragedy
Alright guys, let me just start off with something I just noticed before I go into my weekend. Holy crap where did those almost 400 pageviews come from the other day? I usually schedule my posts in advance (when I'm not writing them last minute, which is a common trend as of late), so I don't always see my pageviews. To be honest, I hadn't looked since maybe Wednesday, so when I jumped from 1,000 to 1,358 in a week, I was surprised. I had a spike of almost 200 on Thursday. So, woah, holy crap where did these pageviews come from out of the blue?!
I hope you liked it and decided to stay! Please do comment and feel free to follow on social media. :)
As far as the blog goes, I'm planning on doing a post toward the end of the month on my experiences with going poo-free. I've been taking periodic pictures of my hair to show my transitions. Don't worry. I'm not going to make you sit through a vacation slideshow photo presentation of my hair or anything. Besides, it will only be one month.
I've also decided a little bit on an upcoming project. A few friends and I are doing a group costume for this year's Anime Weekend Atlanta. I just hate to spoil the surprise before it comes together! I'll hopefully be helping Zach with his, too. It's going to mostly involve sewing, but also a little imagination and construction, as well as a little sculpting and painting. What on earth could it be?!
Remember me posting about sewing patterns last Monday? Well, between Zach and my grandmother I think I've decided to at least give it a shot at making the steampunk dress I bought a pattern for. Now, I'm planning on buying the cheapest non-tulle fabric I can to give a practice run. I really don't want to spend a lot of money on fabric just to give up in the middle of it or to mess it up. I'll definitely keep you posted on that!

Sometimes, I feel like I have a million things going at once. Of course I want to spend time with Zach, Benni, and my little Booger. I want to play video games. I want to craft. I want to play Dungeons and Dragons. I want to read. I want to craft. I want to blog. Ugh, all these things I want to do! I have them almost all going at the same time, but I feel like I get nowhere with them. Sacrifices, I guess. (Enjoy the silly collage. If you want, it enlarges when you click it.)
Now, on to the sadder news. Zach and I received news late last week that one of our friends' mom passed away. This was a friend that we spent almost every day with during last summer and had been friends with since high school. We were all very shocked because, although we knew she wasn't in the best of health, she was still relatively young. He is an only child, his father passed away some years ago, and only really has his grandmother, aunts and uncles.
I'm not saying this to be depressing. He has always been a bit of a loner and will deal with it in his own time. He has all of us and his girlfriend who has helped him tremendously throughout this whole ordeal. We just don't think he's dealt with his feelings yet or gained closure. If you have a spare moment, send your thoughts, prayers, well-wishes, good vibes, or whatever it is you do to this little family in Alabama.
I hate to leave you on such a sad note, so here's a picture that always makes me laugh:

See you guys soon.
Subscribe to:
Posts (Atom)

About Me

Hey. I'm Jeshi and I like to craft all kinds of things. Thanks to the wonders of the internet we DIY-ers can share our processes with others. Want to know more about me? Click here.