Follow Me


Popular Posts
-
A few years ago, I was introduced to the wonderful world of steampunk. If you haven't heard of it before, there are a multitude of re...
-
 I know, I said I might not have anything good for WIP Wednesday due to the slow going on the plarn hobo bag. I would like to add that I man...
 -
 My first question after reading the title would be "What on earth is plarn?" To be honest, I had no idea what plarn was a fe...
 -
Do you know how to knit, crochet, or both? I'm sure you've heard about the amazing website Ravelry , then. If you haven't, let...
-
Happy Labor Day! So, originally, I thought it was only going to be an interview on Tuesday. I spent the entire time from Friday until...


Grab My Button!
Like my blog? Take a button with you. Let your readers know you like to craft something, too!

<div align="center"><a href="http://letscraftsomething.blogger.com" title="Let's Craft Something!" target="_blank"><img src="http://farm4.staticflickr.com/3788/9046676023_899b0f9f44_o.png" alt="Let's Craft Something!" style="border:none;" /></a></div>
Showing posts with label upcycle. Show all posts
Showing posts with label upcycle. Show all posts
Friday, June 21, 2013
Freebie Friday: Organizing with What You Have

As you guys may have noticed, I don't like to spend more money than I have to. Generally, that means that those fancy drawer organizers are out the window. (I do have them in the kitchen, though.) I haven't been on this DIY organization for very long, but my family isn't so great about throwing things away that we could find use for later.

When I saw these cute little confetti painted tumbler glasses, I kept thinking of how familiar they were and realized that we had glass candle holders stowed away that had the same shape. I pulled them out and cleaned them really well before heading to my bathroom with them.

As you can see, I haven't bothered with painting them...yet. (But who knows now that I know it works well.) The top shelf and the top of my shelves were horrid before this. I took the basket from our "junk room" because it wasn't being used. I have some lesser used hair products in there, as well as a container of makeup brushes, a make up bag, and some Vaseline in the basket. I also have my brush and an air freshener up top. On the top shelf, I have one glass candle holder for bobby pins and hair clips, the next is for my hair elastics, then a candle my neighbor gave me for my birthday, a candle holder for my Qtips, and a mason jar styled candle holder for cotton balls. The baskets are from Dollar Tree, I think.
This is just one example of ways that you can organize from things you probably have lying around the house. There are tons of things that you can find online using household items to organize with. For example:
Do you eat soup? Yes? Clean the cans, cover with some pretty paper and BAM! Organization cubbies.

What about cereal? Do you eat cereal? Cut them down, cover them with some pretty paper and BAM! Drawer organization.

Shoes! You have to wear shoes. Guess what? Cover those shoe boxes with some pretty paper and BAM! Storage.

These were just a few of the suggestions that I found through the I Heart Organizing blog. If you need some organizing tips or inspiration, I would definitely recommend checking them out.

And if that's still not enough for you, here's "Top 58 Most Creative Home-Organizing Ideas and DIY Projects". Many of them I've seen before, but they're still pretty good ideas.

What's your favorite DIY organization method? Do you have any suggestions that need to be added?
Conquer that clutter!


Wednesday, June 5, 2013
WIP Wednesday: Plarn Hobo Bag Update and a June To-Do List
Do you ever start a project and realize about halfway through that you wish you hadn't? That's kind of how I feel about my plarn crochet bag. I mean, I love it. I think it looks neat so far and it's a great way to upcycle those annoying plastic bags you get when you go to the grocery store. The only reason why it is taking me so darn long to finish is because it takes me pretty much the same amount of time to make the plarn as it does to crochet it! Not to mention that I have come to the part in the pattern where I have to double crochet; that's when I learned that one of the strips of bags is about two double crochets with a size K (6.5 mm) hook.
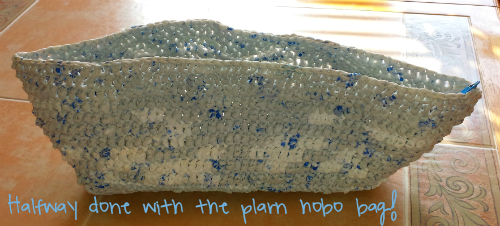
I'm almost done with the bulk of the bag. I lack less than ten rows, then I have to do the strap, and any decoration that I may put on there. This bag is becoming the bane of my existence. It just sits there, staring at me, taunting and pleading with me at the same time.
Also, oops. I went to put clothes away yesterday and realized my closet is horrible. Like, terrible. I don't think I can describe in words how badly organized my closet was. So, I decided to redo it, but that is a post for another day. Yes...I have found something else to put off that stupid bag.

While I keep putting that off, I keep coming up with new things to add to a list of to-do projects. For example, I told Zach that, for our anniversary I was going to make him one of those "three wolf moon" shirts, but with Benni, his/our German Shepherd. That's not to say I am not getting him the best gift with it, also. I'm still working on getting the colors to look right... Like, getting all the dogs to look the same. (Not that it's going to matter as much when it's transferred onto a t-shirt, but whatever.)
After that, he's asked me to make him a quiver for his arrows, since he got back into archery. I thought that didn't sound too hard... All you have to do is sew a cylinder with an open end. So we'll see how that goes.
Then I wanted to work on my steampunk jetpack out of plastic bottles... And...and... Phew. All of this can get a little crazy. Good thing I have you guys here to keep me straight. Okay, here's the priority list:

I'm almost done with the bulk of the bag. I lack less than ten rows, then I have to do the strap, and any decoration that I may put on there. This bag is becoming the bane of my existence. It just sits there, staring at me, taunting and pleading with me at the same time.
Also, oops. I went to put clothes away yesterday and realized my closet is horrible. Like, terrible. I don't think I can describe in words how badly organized my closet was. So, I decided to redo it, but that is a post for another day. Yes...I have found something else to put off that stupid bag.

While I keep putting that off, I keep coming up with new things to add to a list of to-do projects. For example, I told Zach that, for our anniversary I was going to make him one of those "three wolf moon" shirts, but with Benni, his/our German Shepherd. That's not to say I am not getting him the best gift with it, also. I'm still working on getting the colors to look right... Like, getting all the dogs to look the same. (Not that it's going to matter as much when it's transferred onto a t-shirt, but whatever.)
After that, he's asked me to make him a quiver for his arrows, since he got back into archery. I thought that didn't sound too hard... All you have to do is sew a cylinder with an open end. So we'll see how that goes.
Then I wanted to work on my steampunk jetpack out of plastic bottles... And...and... Phew. All of this can get a little crazy. Good thing I have you guys here to keep me straight. Okay, here's the priority list:
- Plarn hobo bag
- Three Benni Moon shirt
- Quiver
- Jetpack
Wednesday, May 29, 2013
WIP Wednesday: More of a Theory than an Actual WIP
Sorry, guys, but I don't have anything really to show you. I know what you're thinking... "She got distracted by Skyrim that much again?!" No, I promise it's a much more legitimate reason than that. My cat seems to have developed a UTI; I noticed frequent bathroom -- well, litterbox -- trips Sunday night and didn't think anything of it. Instead of sleeping with me like he normally does, he slept by my bathroom, near his litterbox. His frequent trips continued on Monday, and I checked because normally, his pee clumps are pretty big. There was hardly anything. I did some quick research online because it was a holiday and my vet was obviously off. I discovered it was probably a UTI and gave him canned food instead to make sure he was getting water. Anyway, I took him to the vet Tuesday morning and they gave him a shot and some antibiodics for me to continue with. I'm having to keep a close eye on him to make sure there are no changes. I'm also pretty paranoid when it comes to my little baby, so I've been pretty distracted.
However, when I went to get cat food, I grabbed a two liter to keep by my desk for when I game. I also had two one liter bottles sitting around because I'm lazy and hadn't taken them out yet. I had toyed with the idea of steampunk jetpack before when I was planning a steampunk Rainbow Dash cosplay, but never quite got around to making it.
 | |
| This is the one that I thought about basing my Rainbow Dash jetpack on. |
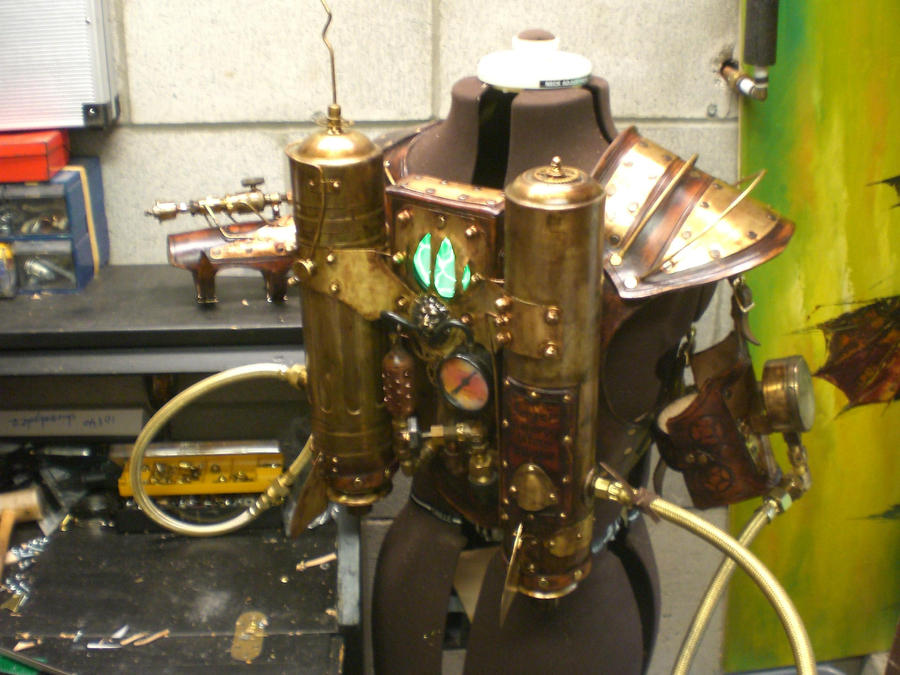 |
| Found on DeviantArt by Skinz-N-Hydez who does amazing costume work. |
I could always go for something a little more ambitious and realistic. But I have no job and I don't want to drop a lot of money on something like a costuming prop. Not to mention i have nowhere to put it!
So there is my conceptual WIP. If you have and ideas to add, sketches, or reference images for me, feel free to link them! I'd be more than happy to check them out. I've also gotten the links page working a little better already. (Remember, I said this website would be a bit of a WIP for a while, too?) Sorry this post didn't have something a little more tangible; as I said, I'm worried about my little Booger and getting him feeling better.
Wednesday, May 15, 2013
WIP Wednesday: Crochet Plarn Hobo Bag

My first question after reading the title would be "What on earth is plarn?" To be honest, I had no idea what plarn was a few weeks ago. I was looking up some stuff on embroidery when I saw something about fusing plastic bags together. I thought that sounded pretty neat, and then I saw that you could somehow make plastic bag yarn, or plarn, to knit and crochet with.
Yarn out of something that I already have a ton of? Why not give it a try? I mean, if I mess up, it's not like I spent money on supplies.
I was pretty skeptical, to be honest. I mean, they're plastic bags. They rip easily when you put too much weight in them, so how could they be that great for knitting or crocheting? As skeptical as I was, I figured I would try it. A lot of people had been doing it already, so there had to be some reason behind it...

I found a super simple tutorial on how to make plarn on a blog called Gooseflesh. The only downside is that it takes a little while to make because you want to be careful not to rip the bags. Her measurements are all in centimeters, but it works out to where approximately 2.5cm is an inch.

If you just want the gist of how she makes plarn, here's the quick textual version. Basically, what she does is fold the bags in half (hotdog style), and again, and again, until her strip is about an inch wide. Then she cuts off the bags at the seams at the bottom and the handle. From there, she cuts the bags into 2cm sections. After you open up the sections of bags, you knot them together and ta-da, double stranded plastic yarn, or plarn.
When I cut my sections of bags, I usually go with an inch width just because it is easier for me. Like this, I can get 12 sections of bags from one bag. This ends up making about a 216 inch section of plarn (with each section being about 18 inches).
Another great thing about plarn is when you reach the end of your plarn string, just add more to it. I've done this probably three times while working on my bag so far.

I only have the base of my bag done right now, but I have already used about 9 bags already. (I'm estimating because I still have some plarn on my homemade spool of a toilet paper roll.) I'm only using Walmart bags right now, mostly because that's what our supply is pretty full of, but also because I like the white color with hints of blue that it puts off.

Ultimately, I'm hoping to get some yellow Dollar General bags to make flowers with also for the finished product. I feel like it would compliment the colors well and really make it look less like recycled bags.

One thing I have learned, though is to be very careful with your knots. They can tear the plarn if you try to force them through. This is why it's important for you to get the knots as small as possible when making your plarn. If you leave bigger knots and get into some tighter stitches, you could end up with the same problem that I did. Learn from my mistakes!
Have you worked with plarn before? What are your thoughts on it? Would you ever consider using it? Fused plastic bags before? What do you do with your plastic bags? Leave a comment and let's get upcycling!
Subscribe to:
Posts (Atom)

About Me

Hey. I'm Jeshi and I like to craft all kinds of things. Thanks to the wonders of the internet we DIY-ers can share our processes with others. Want to know more about me? Click here.