Follow Me


Popular Posts
-
A few years ago, I was introduced to the wonderful world of steampunk. If you haven't heard of it before, there are a multitude of re...
-
 I know, I said I might not have anything good for WIP Wednesday due to the slow going on the plarn hobo bag. I would like to add that I man...
 -
 My first question after reading the title would be "What on earth is plarn?" To be honest, I had no idea what plarn was a fe...
 -
Do you know how to knit, crochet, or both? I'm sure you've heard about the amazing website Ravelry , then. If you haven't, let...
-
Happy Labor Day! So, originally, I thought it was only going to be an interview on Tuesday. I spent the entire time from Friday until...


Grab My Button!
Like my blog? Take a button with you. Let your readers know you like to craft something, too!

<div align="center"><a href="http://letscraftsomething.blogger.com" title="Let's Craft Something!" target="_blank"><img src="http://farm4.staticflickr.com/3788/9046676023_899b0f9f44_o.png" alt="Let's Craft Something!" style="border:none;" /></a></div>
Showing posts with label DIY. Show all posts
Showing posts with label DIY. Show all posts
Friday, July 26, 2013
Freebie Friday: Wrapping Paper
Have you ever had a last minute gift to come up and no suitable wrapping paper? Or just someone who you cannot find the perfect wrapping paper for? I have.
I have gifts on the mind since Heather's Harry Potter Party is tonight. While I didn't worry about not having suitable wrapping paper this time, I thought it was a good idea to share with you since you never know what will pop up.

Have you ever thought about printing wrapping paper? Yeah, from your computer.
Now, of course, I wouldn't recommend this for big gifts simply because of the cost of ink. Granted it would build up over time, but if you just need a quick bit of wrapping paper, why not just print it? It sure beats going to the store for it.
The website I was thinking of has been taken down, but of course Pinterest saved the day. There are also plenty of results on Google. I would think that you could also make your own just as easily. (Maybe with a little help from Pic Monkey?)

Trinkets in Bloom has this great tutorial for actually making wrapping paper if you have time in advance. This would be adorable for Christmas time!
So there you have it. If you're in a bind, just print some wrapping paper! If you have to wrap for a lot of people and the price just adds up, you can always make pretty paper yourself.


I have gifts on the mind since Heather's Harry Potter Party is tonight. While I didn't worry about not having suitable wrapping paper this time, I thought it was a good idea to share with you since you never know what will pop up.

Now, of course, I wouldn't recommend this for big gifts simply because of the cost of ink. Granted it would build up over time, but if you just need a quick bit of wrapping paper, why not just print it? It sure beats going to the store for it.
The website I was thinking of has been taken down, but of course Pinterest saved the day. There are also plenty of results on Google. I would think that you could also make your own just as easily. (Maybe with a little help from Pic Monkey?)
Trinkets in Bloom has this great tutorial for actually making wrapping paper if you have time in advance. This would be adorable for Christmas time!
So there you have it. If you're in a bind, just print some wrapping paper! If you have to wrap for a lot of people and the price just adds up, you can always make pretty paper yourself.
Friday, July 12, 2013
Freebie Friday: Make Your Own Porcelain Dough!
In throwing around ideas for one of my steampunk costumes, I decided to make my own headpiece. The main focus of the headpiece is going to be a starfish. I toyed around with several ways to make this, including buying a real starfish, but ultimately decided to try it with clay first. I wanted something lightweight because it would be on my head, but durable because I am accident prone.

I ran across a blog post by Puffy Little Things where she shares her recipe for homemade cold

I ran across a blog post by Puffy Little Things where she shares her recipe for homemade cold
porcelain dough in the microwave. If you have cornstarch, glue, vinegar, and oil, you have this amazing dough that takes only minutes to make.
She makes these beautiful roses with this recipe. (Rose tutorial here.)
I halved her recipe because I was running low on cornstarch. My old microwave also required four fifteen second cooking sessions instead of three. Once it's kneaded together, the dough is very smooth and soft. I kept playing with the dough and didn't want to put it in the refrigerator!
I haven't sculpted my starfish yet, but I will soon and post pictures. I'm super excited to try out sculpting her dough! Need a little prop for a costume or a cute little gift? This is a great, cheap solution that still looks beautiful and elegant.
Friday, July 5, 2013
Freebie Friday: Make Your Own Shampoo!

You may recall me talking about trying this on Monday, but I finally decided to give the natural shampoo a chance. I ran out of shampoo and whipped up a batch, but before I did, I had to find a recipe. Boy was that overwhelming...
There seem to be as many different recipes for it as there are in the store! People were sharing what worked best for them, which is great because everyone has different hair types. I did notice two common ingredients: baking soda and apple cider vinegar. Baking soda is generally used in the wash, and ACV in the rinse. Baking soda is a base, just like detergents, but because it's one of the weakest, it takes a lot of it to damage your hair. ACV is an acid (which is why vinegar and baking soda react when in contact with one another). It helps detangle, balance the pH levels in your hair, and seals the cuticles.
Of course, there are different herbs that you can add to give different properties to your wash; you can also add honey, citrus juice, teas, and pretty much anything you can think of. I bet there's someone who's tried it all. If you want to smell all nice and clean, you can always add a few drops of essential oils to perk of the scent.
I'm still tweaking my recipe to see what I like best, so for now, I will share some of my resources with you. Don't worry, I'll post my experiences soon enough.
Babyslime has definitely done her homework on the poo-free way. In her lengthy post, she explains why to go poo-free, what's wrong with shampoo, how to go poo-free, what the ingredients do, what herbs to use (if you want to), and a few extra recipes. She also has what to do if your hair is "too long", if it has gone frizzy, if it feels greasy, if it feels dry, if you have buildup, if you get itchy, if you have dandruff, if you have limp or weak hair, and if you have hard water. She's also 16 years poo-free. (Nine at the time of writing this entry.)

Kitchen Stewardship is another useful site I had pulled up. She goes through her year-long experience of going poo-free. It is where I learned the most about the detoxing period you hair may go through. She includes her recipe, which has the same two components, and some drawbacks she has found in her experience.
Simple Mom is actually the first website I found, and it linked me to Babyslime's overwhelmingly informative post. She shares her experience in the three months she's been poo-free, some tips she's collected, and finally the recipe she uses.

It's all largely the same; it's just personal preference and hair type that makes it different. You can tweak it anyway you like and even to where it's what you have on hand. Take a look at all the different recipes and try a few out. Tweak it for next time if you don't like it.
Have you gone poo-free? Or would you go poo-free?
Wednesday, July 3, 2013
WIP Wednesday: Nail Polish Rack, Part Two
It's a miracle! I finished it finally!

When we last left off, my rack was lacking the back, dowels, and those rough edges were still just sitting there being hideous. Well, I took the back, spray painted it for a nice, even color, and taped off some chevrons to add a little bit of color.


I did eyeball the chevrons so they're not great. I didn't want to become too obsessed with something that was going to be hidden behind pretty bottles of nail polish. While the pink was drying, I went out and spray painted my dowels. (Okay, so my dowels are really just bamboo skewers, but that's neither here nor there.)


After taking the tape off, I noticed some of my pink paint had seeped through. Oh butts. But then I went and raided my stash of paints to see what could work; I could smooth out the edge with a pinkish color, or just paint over it with white. Then, I saw this cute little bottle of brown paint -- the kind for fabric that always stays a little raised.

I grabbed a few backups (pink, silver, and white), but when I tested the brown, I loved it. And I realized I could do cute little chevrons to break up the large chunks, too. It was great. Again, my lines aren't perfect, but it's eyeballed.

I hot glued the back to the rest of the rack and started covering my edges with the ribbon that I had bought.

With some Velcro Command Strips, I stuck it to the side of my bathroom organizer and filled it with nail polish. All of the bottles in my room fit perfectly in there!

Added bonus: A few days ago, I stole a magazine rack from my garage that was literally just collecting dust. (I'm not kidding, it was pretty gross.) I cleaned it up, spray painted it white, and with the help of some Command hooks, I have a place to store my straightener and hair dryer that is neither on the floor nor in my way in the tiny cabinet under the sink.
Total cost for both of these projects: $2.50.
Foam board: Free, lying around the house.
Hot glue: Free, lying around the house.
Paints: Free, lying around the house.
Bamboo skewers: Free, lying around the kitchen drawer.
Ribbon: $1
Magazine rack: Free, lying around the garage.
Velcro Command Strips: Free, Nana gave them to me when she heard about this project.
Command Strip Hooks: $1.50 from Dollar General.
Are they perfect? No. Are they functional? Yes. Do I love them? Yes.
I promise I'm going back to regular crafts now that Junk-Free June is over with. Promise.

When we last left off, my rack was lacking the back, dowels, and those rough edges were still just sitting there being hideous. Well, I took the back, spray painted it for a nice, even color, and taped off some chevrons to add a little bit of color.


I did eyeball the chevrons so they're not great. I didn't want to become too obsessed with something that was going to be hidden behind pretty bottles of nail polish. While the pink was drying, I went out and spray painted my dowels. (Okay, so my dowels are really just bamboo skewers, but that's neither here nor there.)


After taking the tape off, I noticed some of my pink paint had seeped through. Oh butts. But then I went and raided my stash of paints to see what could work; I could smooth out the edge with a pinkish color, or just paint over it with white. Then, I saw this cute little bottle of brown paint -- the kind for fabric that always stays a little raised.

I grabbed a few backups (pink, silver, and white), but when I tested the brown, I loved it. And I realized I could do cute little chevrons to break up the large chunks, too. It was great. Again, my lines aren't perfect, but it's eyeballed.

I hot glued the back to the rest of the rack and started covering my edges with the ribbon that I had bought.

With some Velcro Command Strips, I stuck it to the side of my bathroom organizer and filled it with nail polish. All of the bottles in my room fit perfectly in there!

Added bonus: A few days ago, I stole a magazine rack from my garage that was literally just collecting dust. (I'm not kidding, it was pretty gross.) I cleaned it up, spray painted it white, and with the help of some Command hooks, I have a place to store my straightener and hair dryer that is neither on the floor nor in my way in the tiny cabinet under the sink.
Total cost for both of these projects: $2.50.
Foam board: Free, lying around the house.
Hot glue: Free, lying around the house.
Paints: Free, lying around the house.
Bamboo skewers: Free, lying around the kitchen drawer.
Ribbon: $1
Magazine rack: Free, lying around the garage.
Velcro Command Strips: Free, Nana gave them to me when she heard about this project.
Command Strip Hooks: $1.50 from Dollar General.
Are they perfect? No. Are they functional? Yes. Do I love them? Yes.
I promise I'm going back to regular crafts now that Junk-Free June is over with. Promise.
Wednesday, June 26, 2013
WIP Wednesday: DIY Nail Polish Rack, Part One

So I had this aha moment while cleaning up from my closet shelves. This little box seemed to be a strangely familiar size. It took me a bit to realize it was the same size as my bathroom storage shelves. Then, I had the wonderful idea of turning it into a nail polish rack.

I cut the box and made little shelves, fixed them with masking tape and covered the whole thing in layers of Mod Podge, hoping it would seal the tape in, and make the cardboard sturdier. I covered it with a few layers of spray paint, and ta da!
No, not really. The masking tape showed through pretty much no matter what. I tried more layers of paint, sanding it down to help level it out, and nothing seemed to work. So, I scrapped it and started over. I didn't feel too bad tossing it in the recycling bin since it was something I had salvaged anyway.
Take Two:
I noticed these spare pieces of wainscoting that were collecting dust in our garage. They were all left over from when we remodeled our kitchen, so I assumed them to be fair game. The only thing stopping me was that we didn't have a power saw. Thankfully, though, I have a loving boyfriend who does.I drew out a rough sketch of what I wanted, measured them on the board, and Zach was even kind enough to cut them for me. (I guess he was afraid of me losing a finger...) He also suggested that I paint the pieces before I try to assemble it, so I took it home and painted.
Once my layers seemed thick enough to cover the dark mauve color we have in the kitchen, I decided that I was done painting and I could start assembling. I had planned on using wood glue to hold it together, then going back over it with nails or staples. The only thing stopping me now was that we didn't have any wood glue.

I glued the long sides first, and realized that I could match up the lines on the wainscoting lined up great. Not to mention the fact that they are 2" apart, so I can use them for guides for my shelves.
When the glue dried, it was warped and both of the sides were tilted inward.

Take Three:
Whilst browsing YouTube for completely unrelated things, a DIY nail polish rack video showed up on the related videos. "I'll see how they did it," I told myself as I clicked it. It was a pretty good video, actually. She used foam board, which I happened to have two large sheets of from when I was thinking about my World of Warcraft cosplay.I kind of merged two tutorials. I took BluSuga's video tutorial and mixed it with the PaperCastle tutorial for the shelves. What I ended up doing was cutting slits in the sides and shelves so I could make them interlocking. I thought this would make it a little more stable. I took some panel board nails and reinforced them on the sides, then hot glued another side strip over it, just to make sure. I took it out and spray painted it white just to cover any imperfections.

Right now, I have the frame with it's rough foam board edges. I wanted to wait to make sure everything was glued and that I liked it before I cut the back. Once I get it done, I thought about doing a pink and white chevron design on it for just a pop of color since it will be against a white surface. I'm also going to add some white dowels to the front just to make sure the polishes don't slip out. I also plan on covering those rough edges with some ribbon that I picked up.

That's my WIP right now. Well, one of them at least. Hopefully this will be done soon and I can share with you it's awesome glory!
Friday, June 7, 2013
Freebie Friday: Spice Up Old Heels

Alright girls, how many of you have an old pair of plain heels that you loved at one time, got on sale, or you never wear because they're plain and boring? Well, I don't even know how I came across it, but Maegan over at Love Maegan has a great tutorial for how to revamp those heels using those heels, fabric, and Mod Podge.
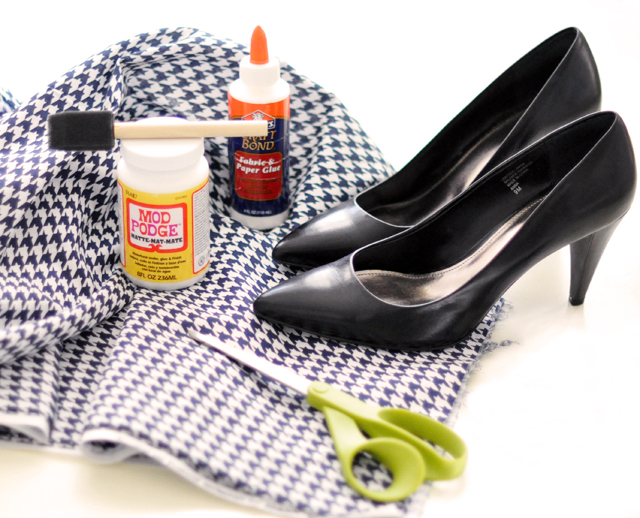
She turned her boring black heels into this:
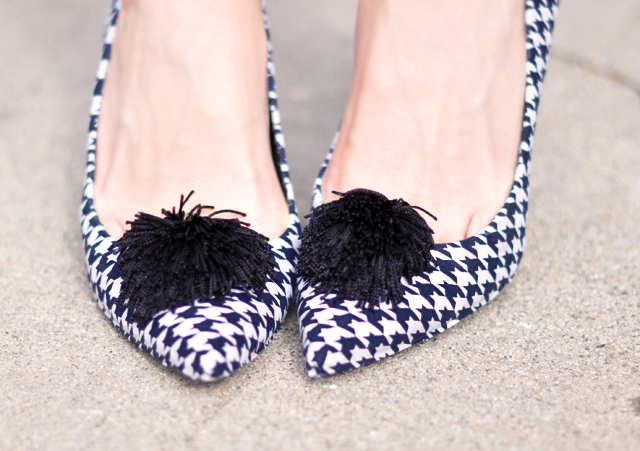
Of course, yours don't have to be hounds tooth or have the little pom pom at the toe, but it's a wonderful idea, in my opinion. And you probably have all of these materials at home already if you're a crafter. Here is her tutorial for this super shoe makeover.
 She also has a tutorial for making cute lace socks to wear with your heels, which I think is another great way to spice up your shoes. This is also a good idea if you're afraid of messing up a pair with Mod Podge!
Of course, she does have more than just shoe tutorials, but I stumbled into the shoe section and fell in love with her neat ideas! Before you throw your heels away, be sure to check how you can revamp them and fall in love with them all over again! Visit Love Maegan for all of her great tutorials.
*All of the photos in this post were from Love Maegan. I did not create any of these; all credit belongs to her.

Subscribe to:
Posts (Atom)

About Me

Hey. I'm Jeshi and I like to craft all kinds of things. Thanks to the wonders of the internet we DIY-ers can share our processes with others. Want to know more about me? Click here.