Follow Me


Popular Posts
-
A few years ago, I was introduced to the wonderful world of steampunk. If you haven't heard of it before, there are a multitude of re...
-
 I know, I said I might not have anything good for WIP Wednesday due to the slow going on the plarn hobo bag. I would like to add that I man...
 -
 My first question after reading the title would be "What on earth is plarn?" To be honest, I had no idea what plarn was a fe...
 -
Do you know how to knit, crochet, or both? I'm sure you've heard about the amazing website Ravelry , then. If you haven't, let...
-
Happy Labor Day! So, originally, I thought it was only going to be an interview on Tuesday. I spent the entire time from Friday until...


Grab My Button!
Like my blog? Take a button with you. Let your readers know you like to craft something, too!
<div align="center"><a href="http://letscraftsomething.blogger.com" title="Let's Craft Something!" target="_blank"><img src="http://farm4.staticflickr.com/3788/9046676023_899b0f9f44_o.png" alt="Let's Craft Something!" style="border:none;" /></a></div>
Showing posts with label Freebie Friday. Show all posts
Showing posts with label Freebie Friday. Show all posts
Friday, August 23, 2013
Freebie Friday: Scraps to Shelves!
Alright, so I can't take credit for this. I mentioned to my grandparents that I was considering making a type of bookcase for my closet; not for actual books, but for miscellaneous things. I had drawn up a blueprint, but since we don't have a power saw, it'd be a pain in the butt for me to try to make it myself.
Nana had been asking dimensions for it and pointed out a part of a desk that they had in their garage. It was a little taller than I was originally going for, but I wasn't going to complain. The width was about perfect and it already had shelves.
She called again a week or so later wanting to double check the dimensions one last time because "Pop was looking for something to do" that day. I confirmed and reconfirmed that the dimensions were right and that I was sure it would work.
A mere few hours later and this beauty was finished! The body of it is from a desk and the backing was leftover cabinet wood.

I mostly wanted something where I could put my perfume and lotion bottles so they would be out of the way, but I also realized it would be great for some of the makeup that I don't use regularly. I'm still working on filling up the shelves, but that's an amazing feeling.
Also, you can see my repurposed cans. I haven't gotten around to covering them, but I thought they worked quite nicely. I may have to salvage a few more from the recycle bin.
So remember, craftranauts: Next time you're making a yard sale pile or going through yard sales, look at things from a different angle. Think of different purposes it could have. Think outside of the box.
Like I really have to tell you guys that...


Nana had been asking dimensions for it and pointed out a part of a desk that they had in their garage. It was a little taller than I was originally going for, but I wasn't going to complain. The width was about perfect and it already had shelves.
She called again a week or so later wanting to double check the dimensions one last time because "Pop was looking for something to do" that day. I confirmed and reconfirmed that the dimensions were right and that I was sure it would work.
A mere few hours later and this beauty was finished! The body of it is from a desk and the backing was leftover cabinet wood.
I mostly wanted something where I could put my perfume and lotion bottles so they would be out of the way, but I also realized it would be great for some of the makeup that I don't use regularly. I'm still working on filling up the shelves, but that's an amazing feeling.
Also, you can see my repurposed cans. I haven't gotten around to covering them, but I thought they worked quite nicely. I may have to salvage a few more from the recycle bin.
So remember, craftranauts: Next time you're making a yard sale pile or going through yard sales, look at things from a different angle. Think of different purposes it could have. Think outside of the box.
Like I really have to tell you guys that...
Friday, August 2, 2013
Freebie Friday: Meal Planners
Happy August, everyone!
Alright, guys and girls, I mentioned on Wednesday that I was trying to start meal planning for myself. I say myself because I'm a vegetarian and I would honestly never have a clue how many to cook for if I even did plan something that I could omit the meat. That's neither here nor there, though.
I'm starting meal planning (or hopefully starting it) to help myself lose weight. Like Zach pointed out, the less time I spend dwelling over what's for dinner, the less time I would think about food, so the less hungry I would be throughout the day.
Meal planning is also a great way to budget if you're trying to watch your spending. It's also great for families with children so you don't have to hear that infamous "What's for dinner?" Whatever your reason for meal planning, I'm sure it was difficult to begin with, but has made life easier.
I admit, I'm a fan of hand-writing things. I know it's easier to type it -- at least for me -- but I remember more if I write it by hand. When I ran across printable meal planners, I was happy. (Because, of course I also like things to be cute. Duh.)


Me? I had just planned on doing something simple like this planner from Grace Got Healthy for right now. At least for while I'm just planning for myself. I've found that I don't need a snack between breakfast and lunch, nor after dinner. If I do grant myself a dessert, it's just a fruit, though.
You can find plenty of printable meal planners and how people use them on Pinterest.
I also found that there were a few on Microsoft. I was looking for "planner" because I doubted they had meal planner templates. I was wrong, though! If you don't find one you like on Pinterest or through Google, you can always make your own by tweaking the templates in Word.
Do you guys meal plan? What method do you use?
Friday, July 26, 2013
Freebie Friday: Wrapping Paper
Have you ever had a last minute gift to come up and no suitable wrapping paper? Or just someone who you cannot find the perfect wrapping paper for? I have.
I have gifts on the mind since Heather's Harry Potter Party is tonight. While I didn't worry about not having suitable wrapping paper this time, I thought it was a good idea to share with you since you never know what will pop up.

Have you ever thought about printing wrapping paper? Yeah, from your computer.
Now, of course, I wouldn't recommend this for big gifts simply because of the cost of ink. Granted it would build up over time, but if you just need a quick bit of wrapping paper, why not just print it? It sure beats going to the store for it.
The website I was thinking of has been taken down, but of course Pinterest saved the day. There are also plenty of results on Google. I would think that you could also make your own just as easily. (Maybe with a little help from Pic Monkey?)
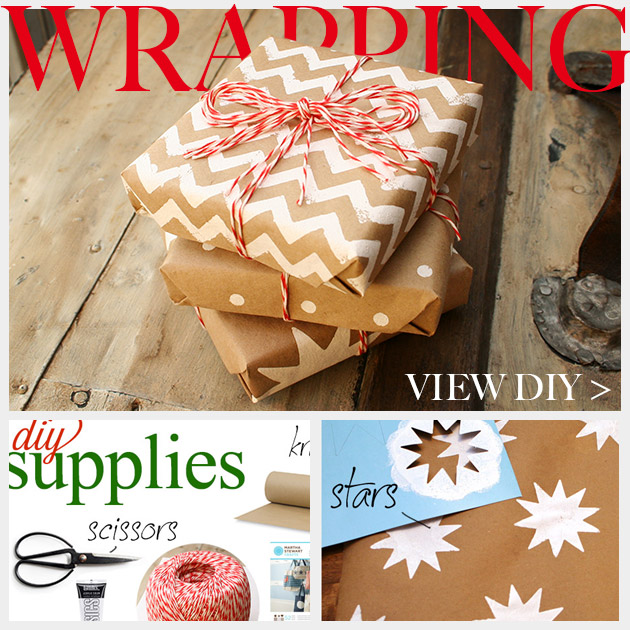
Trinkets in Bloom has this great tutorial for actually making wrapping paper if you have time in advance. This would be adorable for Christmas time!
So there you have it. If you're in a bind, just print some wrapping paper! If you have to wrap for a lot of people and the price just adds up, you can always make pretty paper yourself.
I have gifts on the mind since Heather's Harry Potter Party is tonight. While I didn't worry about not having suitable wrapping paper this time, I thought it was a good idea to share with you since you never know what will pop up.
Now, of course, I wouldn't recommend this for big gifts simply because of the cost of ink. Granted it would build up over time, but if you just need a quick bit of wrapping paper, why not just print it? It sure beats going to the store for it.
The website I was thinking of has been taken down, but of course Pinterest saved the day. There are also plenty of results on Google. I would think that you could also make your own just as easily. (Maybe with a little help from Pic Monkey?)
Trinkets in Bloom has this great tutorial for actually making wrapping paper if you have time in advance. This would be adorable for Christmas time!
So there you have it. If you're in a bind, just print some wrapping paper! If you have to wrap for a lot of people and the price just adds up, you can always make pretty paper yourself.
Friday, July 19, 2013
Freebie Friday: Making Your Photos Pretty
Alright. I admit that this has nothing to do with my costume or upcoming projects. I just couldn't think of free things I've used so far except for the dough recipe, which I shared last week. But still, I thought it was great once I sat down and played with it for a while. What am I talking about?


This was what I used when I first started getting into PicMonkey. As you can see, Katrina's Kitchen did a 4 part series on different aspects of PicMonkey. They're all super easy to read and follow. If you take a close look around the site and the Facebook page, you may be able to see where I learned a few things. :)


You know it, you love it... PicMonkey.
I was hesitant because I liked those swanky programs that were totally not user friendly and I ended up never using because of such. Yeah. PicMonkey is nothing like that. Here are some tutorials that I found useful for PicMonkey.
This was what I used when I first started getting into PicMonkey. As you can see, Katrina's Kitchen did a 4 part series on different aspects of PicMonkey. They're all super easy to read and follow. If you take a close look around the site and the Facebook page, you may be able to see where I learned a few things. :)
"But PicMonkey is a dinky little free program and I can't do much with it without paying money and blah blah." You know, I thought that, too. Until I started playing around with it, that is. Let Leigh Valley Momma give you a few pointers on how to take advantage of the features. It really has more features than it seems, but it's still simple to use.
Posting your photos online? A watermark is always a great idea. I haven't quite started working with watermarks yet -- mostly because I keep thinking I'll make a brush for it that I can simple click and place -- but it's coming! Rags to Stitches has a great tutorial on making watermarks in PicMonkey.
Of course, a quick search will get you tons more results. I just wanted to share a few of them.
Now, as a free user, it's relatively limited, which is why I like to supplement my photos with a few other programs. I don't have Photoshop (yet), so I make do with what I can.
For example, my uncle who works with programming suggested Gimp, which is my default program for artsy stuff now. I haven't quite gotten the hang of it yet, but I'm working on it! My favorite part about it is that it is free.
Then a friend turned me on to a more advanced photo editor called simply Online Image Editor, which is more like a user-friendly version of Gimp that is browser-based. I also thought it was pretty neat that you can make gif files with it also.
The photos that I post on my blog are usually used in a combination of ways. I like the fonts on my computer, so I do my fonts through Gimp. I edit the coloration through Online Image Editor. If I want to make a collage or something cute, I use PicMonkey in conjunction.
What do you use for image editing? If you don't have one you love, give these a try!
Friday, July 12, 2013
Freebie Friday: Make Your Own Porcelain Dough!
In throwing around ideas for one of my steampunk costumes, I decided to make my own headpiece. The main focus of the headpiece is going to be a starfish. I toyed around with several ways to make this, including buying a real starfish, but ultimately decided to try it with clay first. I wanted something lightweight because it would be on my head, but durable because I am accident prone.

I ran across a blog post by Puffy Little Things where she shares her recipe for homemade cold

I ran across a blog post by Puffy Little Things where she shares her recipe for homemade cold
porcelain dough in the microwave. If you have cornstarch, glue, vinegar, and oil, you have this amazing dough that takes only minutes to make.
She makes these beautiful roses with this recipe. (Rose tutorial here.)
I halved her recipe because I was running low on cornstarch. My old microwave also required four fifteen second cooking sessions instead of three. Once it's kneaded together, the dough is very smooth and soft. I kept playing with the dough and didn't want to put it in the refrigerator!
I haven't sculpted my starfish yet, but I will soon and post pictures. I'm super excited to try out sculpting her dough! Need a little prop for a costume or a cute little gift? This is a great, cheap solution that still looks beautiful and elegant.
Friday, July 5, 2013
Freebie Friday: Make Your Own Shampoo!

You may recall me talking about trying this on Monday, but I finally decided to give the natural shampoo a chance. I ran out of shampoo and whipped up a batch, but before I did, I had to find a recipe. Boy was that overwhelming...
There seem to be as many different recipes for it as there are in the store! People were sharing what worked best for them, which is great because everyone has different hair types. I did notice two common ingredients: baking soda and apple cider vinegar. Baking soda is generally used in the wash, and ACV in the rinse. Baking soda is a base, just like detergents, but because it's one of the weakest, it takes a lot of it to damage your hair. ACV is an acid (which is why vinegar and baking soda react when in contact with one another). It helps detangle, balance the pH levels in your hair, and seals the cuticles.
Of course, there are different herbs that you can add to give different properties to your wash; you can also add honey, citrus juice, teas, and pretty much anything you can think of. I bet there's someone who's tried it all. If you want to smell all nice and clean, you can always add a few drops of essential oils to perk of the scent.
I'm still tweaking my recipe to see what I like best, so for now, I will share some of my resources with you. Don't worry, I'll post my experiences soon enough.
Babyslime has definitely done her homework on the poo-free way. In her lengthy post, she explains why to go poo-free, what's wrong with shampoo, how to go poo-free, what the ingredients do, what herbs to use (if you want to), and a few extra recipes. She also has what to do if your hair is "too long", if it has gone frizzy, if it feels greasy, if it feels dry, if you have buildup, if you get itchy, if you have dandruff, if you have limp or weak hair, and if you have hard water. She's also 16 years poo-free. (Nine at the time of writing this entry.)

Kitchen Stewardship is another useful site I had pulled up. She goes through her year-long experience of going poo-free. It is where I learned the most about the detoxing period you hair may go through. She includes her recipe, which has the same two components, and some drawbacks she has found in her experience.
Simple Mom is actually the first website I found, and it linked me to Babyslime's overwhelmingly informative post. She shares her experience in the three months she's been poo-free, some tips she's collected, and finally the recipe she uses.

It's all largely the same; it's just personal preference and hair type that makes it different. You can tweak it anyway you like and even to where it's what you have on hand. Take a look at all the different recipes and try a few out. Tweak it for next time if you don't like it.
Have you gone poo-free? Or would you go poo-free?
Friday, June 28, 2013
Freebie Friday: What is Organizing without Labels?!

What is organizing without things having labels? I honestly don't know! (Unless you're using all clear containers.) I don't like having to rummage through boxes, storage totes, or what have you to figure out if I even have the right box or not. I like labels.
My problem is that I don't have storage that I feel like I could really use labels on. If you're like me and don't like to spend much, there are several ways that you could make cute storage for cheap -- then label it with its contents!
For example, if you're a sewer -- er, seamstress -- you can always sew pretty storage boxes such as this.

Make It, Love It has a great sewing tutorial...and there's even a window for the label.
If you're a little less nimble with a thimble, you can always use cardboard. There's even the option to cover it with fabric once you've made it. (Don't worry, it's no-sew).

Miss Repurpose shows how to make these pretty fabric covered boxes from cardboard.
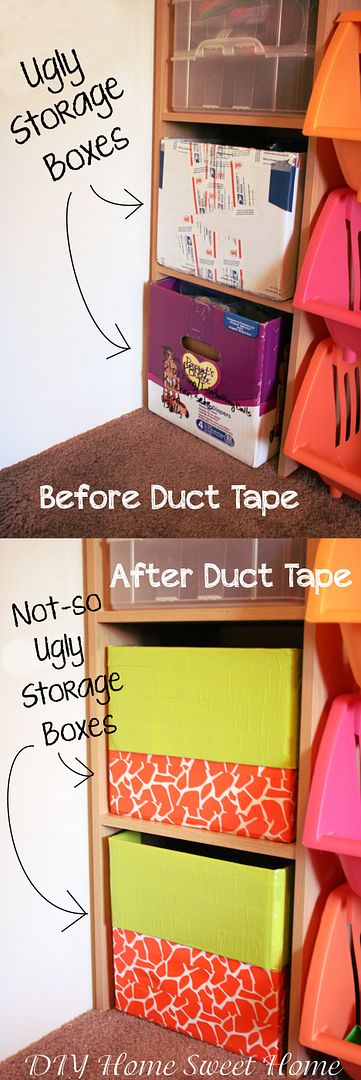
DIY Home Sweet Home covers boxes with Duct Tape to make them pretty.
If you're a fan of mason jars, there are many different ways to turn those into storage.

There are the things I linked in my "Organizing with What You Have" post, where I encouraged you to look around. I have a pencil holder on my desk that I made from an empty oatmeal container.
Use your imagination with storage. It doesn't have to all be uniform. (Unless you're a little OCD like me.)
Once you have your storage created, get some pretty paper and start labeling! Find a template you like for your labels and print the contents on it.
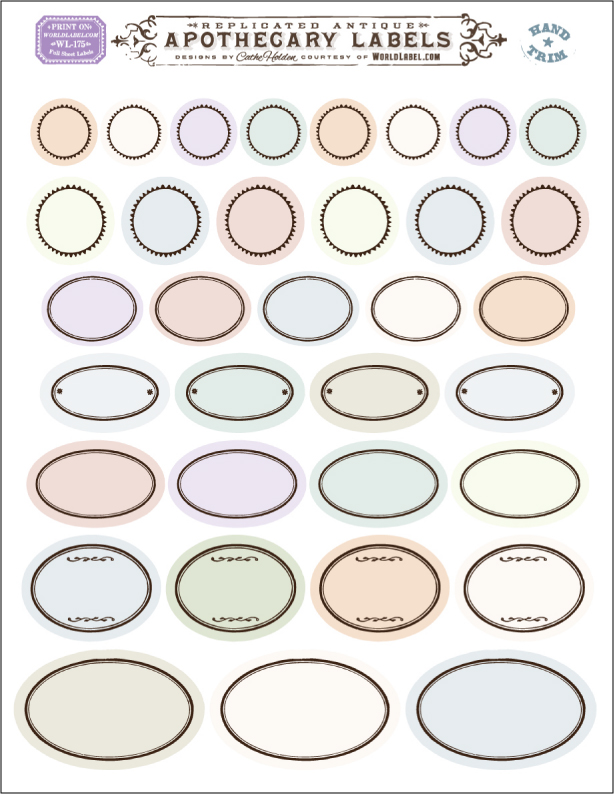
I may be in love with Apothecary Labels...
You could always laminate the label and then write on it so it's erasable. Don't have a laminator? Use clear packing tape; it's been my go-to for years.
Now, you can just paint a little chalkboard paint on there and then change it as the storage does. Don't have chalkboard paint and don't want to shell out for it? You can always make your own!

Rust and Sunshine shared these simple chalkboard labels.

Cheap and simple recipe for your own chalkboard paint from BrightNest.
Now then, go and get label crazy! Do you already use pretty little labels? Which method is your favorite? Send some pictures and show off those labels!
Friday, June 21, 2013
Freebie Friday: Organizing with What You Have
As you guys may have noticed, I don't like to spend more money than I have to. Generally, that means that those fancy drawer organizers are out the window. (I do have them in the kitchen, though.) I haven't been on this DIY organization for very long, but my family isn't so great about throwing things away that we could find use for later.

When I saw these cute little confetti painted tumbler glasses, I kept thinking of how familiar they were and realized that we had glass candle holders stowed away that had the same shape. I pulled them out and cleaned them really well before heading to my bathroom with them.

As you can see, I haven't bothered with painting them...yet. (But who knows now that I know it works well.) The top shelf and the top of my shelves were horrid before this. I took the basket from our "junk room" because it wasn't being used. I have some lesser used hair products in there, as well as a container of makeup brushes, a make up bag, and some Vaseline in the basket. I also have my brush and an air freshener up top. On the top shelf, I have one glass candle holder for bobby pins and hair clips, the next is for my hair elastics, then a candle my neighbor gave me for my birthday, a candle holder for my Qtips, and a mason jar styled candle holder for cotton balls. The baskets are from Dollar Tree, I think.
This is just one example of ways that you can organize from things you probably have lying around the house. There are tons of things that you can find online using household items to organize with. For example:
Do you eat soup? Yes? Clean the cans, cover with some pretty paper and BAM! Organization cubbies.

What about cereal? Do you eat cereal? Cut them down, cover them with some pretty paper and BAM! Drawer organization.

Shoes! You have to wear shoes. Guess what? Cover those shoe boxes with some pretty paper and BAM! Storage.

These were just a few of the suggestions that I found through the I Heart Organizing blog. If you need some organizing tips or inspiration, I would definitely recommend checking them out.

And if that's still not enough for you, here's "Top 58 Most Creative Home-Organizing Ideas and DIY Projects". Many of them I've seen before, but they're still pretty good ideas.

What's your favorite DIY organization method? Do you have any suggestions that need to be added?
Conquer that clutter!
Friday, June 14, 2013
Freebie Friday: Blog Planner!
Remember how I said I was making a blog planner that I could use? Well, I got it pretty much finished. I say "pretty much" because I feel like it's something I'll always be tweaking to some extent. Seeing as I don't have sponsors, I don't have the need right now for a sponsors and expenses page as many blogging planners featured.


This is a 12 page download including a title page, table of contents, blog ideas page, blog to-do page, blog improvement page, monthly calendars, weekly planners, post planners, and blog stats. More may be added later. This file is in a Word document so that you can easily edit its contents to match your needs and likes.
Feel free to download it and edit as you see fit. I just wanted one that fit my style a little more and included a few things. If you improve upon it and don't mind sharing it with me, please do. Mine was just made in Word (again, for right now).
If you want to download it, here is the link. Enjoy your blog planning!
Subscribe to:
Posts (Atom)

About Me

Hey. I'm Jeshi and I like to craft all kinds of things. Thanks to the wonders of the internet we DIY-ers can share our processes with others. Want to know more about me? Click here.