Follow Me


Popular Posts
-
A few years ago, I was introduced to the wonderful world of steampunk. If you haven't heard of it before, there are a multitude of re...
-
 I know, I said I might not have anything good for WIP Wednesday due to the slow going on the plarn hobo bag. I would like to add that I man...
 -
 My first question after reading the title would be "What on earth is plarn?" To be honest, I had no idea what plarn was a fe...
 -
Do you know how to knit, crochet, or both? I'm sure you've heard about the amazing website Ravelry , then. If you haven't, let...
-
Happy Labor Day! So, originally, I thought it was only going to be an interview on Tuesday. I spent the entire time from Friday until...


Grab My Button!
Like my blog? Take a button with you. Let your readers know you like to craft something, too!
<div align="center"><a href="http://letscraftsomething.blogger.com" title="Let's Craft Something!" target="_blank"><img src="http://farm4.staticflickr.com/3788/9046676023_899b0f9f44_o.png" alt="Let's Craft Something!" style="border:none;" /></a></div>
Showing posts with label nail polish. Show all posts
Showing posts with label nail polish. Show all posts
Wednesday, September 4, 2013
WIP Wednesdays: Starfish Wrap-Up
I know you have to be so tired of hearing about this stupid starfish headpiece by now! There is good news, though: I'm practically finished with him!


In case you've been living under a rock since 1995, this is Staryu. He's one of the original 151 Pokemon, so I guess to be fair, I should say "unless you've been living under a rock since 1995 OR you hopped on the Pokemon bandwagon after the first few generations." Staryu's gem doesn't seem as bright in this picture, but you can see the weird little gem holder thong that he does have. (I've checked other angles -- it's only around one leg.) I also changed the coloration to look a little more realistic, such as trying to make him look more porous like an actual starfish.

I finally hot glued his gem and holder to his body, which is a huge relief for me. I was afraid of losing parts of him. I also cut out a star from some stiff felt and hot glued it as a backing. All I lack is gluing on the clips to keep him in my hair.

Even though I have yet to wear him, I love him. I've put a lot of time and effort into him and tried to correct as many imperfections as I could, though some were not avoidable. At least they are hardly noticeable from personal-space-distance.
After my interview yesterday, I thought long and hard about going to get a cupcake as a reward. I managed to calm myself and decided to go to Thrift Mart instead. Instead of gaining calories, I lost them walking around. Take that, fat.
I also gained a pair of pants, shirt, large skirt that I will need to take in, and a very large bed sheet that I can use for sewing my skirt. I was looking for a yellowish color and this color is nearly what I was looking for. For $2, I think I can spend some time aging it to make it a little less bright. (I tried to take a picture, but the brightness just was not coming through.)
Just a heads-up for what's coming next.


Source, along with a game!
That's right, he's a Pokemon. If that isn't enough of a hint, I made a Staryu, who is one of Misty's main Pokemon. I'm not planning on doing a traditional Misty because that would look absolutely horrible on me; as I've said, we are doing steampunk trainers.

I finally hot glued his gem and holder to his body, which is a huge relief for me. I was afraid of losing parts of him. I also cut out a star from some stiff felt and hot glued it as a backing. All I lack is gluing on the clips to keep him in my hair.

Even though I have yet to wear him, I love him. I've put a lot of time and effort into him and tried to correct as many imperfections as I could, though some were not avoidable. At least they are hardly noticeable from personal-space-distance.
**********
After my interview yesterday, I thought long and hard about going to get a cupcake as a reward. I managed to calm myself and decided to go to Thrift Mart instead. Instead of gaining calories, I lost them walking around. Take that, fat.
I also gained a pair of pants, shirt, large skirt that I will need to take in, and a very large bed sheet that I can use for sewing my skirt. I was looking for a yellowish color and this color is nearly what I was looking for. For $2, I think I can spend some time aging it to make it a little less bright. (I tried to take a picture, but the brightness just was not coming through.)
Just a heads-up for what's coming next.
Wednesday, July 3, 2013
WIP Wednesday: Nail Polish Rack, Part Two
It's a miracle! I finished it finally!

When we last left off, my rack was lacking the back, dowels, and those rough edges were still just sitting there being hideous. Well, I took the back, spray painted it for a nice, even color, and taped off some chevrons to add a little bit of color.


I did eyeball the chevrons so they're not great. I didn't want to become too obsessed with something that was going to be hidden behind pretty bottles of nail polish. While the pink was drying, I went out and spray painted my dowels. (Okay, so my dowels are really just bamboo skewers, but that's neither here nor there.)


After taking the tape off, I noticed some of my pink paint had seeped through. Oh butts. But then I went and raided my stash of paints to see what could work; I could smooth out the edge with a pinkish color, or just paint over it with white. Then, I saw this cute little bottle of brown paint -- the kind for fabric that always stays a little raised.

I grabbed a few backups (pink, silver, and white), but when I tested the brown, I loved it. And I realized I could do cute little chevrons to break up the large chunks, too. It was great. Again, my lines aren't perfect, but it's eyeballed.

I hot glued the back to the rest of the rack and started covering my edges with the ribbon that I had bought.

With some Velcro Command Strips, I stuck it to the side of my bathroom organizer and filled it with nail polish. All of the bottles in my room fit perfectly in there!

Added bonus: A few days ago, I stole a magazine rack from my garage that was literally just collecting dust. (I'm not kidding, it was pretty gross.) I cleaned it up, spray painted it white, and with the help of some Command hooks, I have a place to store my straightener and hair dryer that is neither on the floor nor in my way in the tiny cabinet under the sink.
Total cost for both of these projects: $2.50.
Foam board: Free, lying around the house.
Hot glue: Free, lying around the house.
Paints: Free, lying around the house.
Bamboo skewers: Free, lying around the kitchen drawer.
Ribbon: $1
Magazine rack: Free, lying around the garage.
Velcro Command Strips: Free, Nana gave them to me when she heard about this project.
Command Strip Hooks: $1.50 from Dollar General.
Are they perfect? No. Are they functional? Yes. Do I love them? Yes.
I promise I'm going back to regular crafts now that Junk-Free June is over with. Promise.

When we last left off, my rack was lacking the back, dowels, and those rough edges were still just sitting there being hideous. Well, I took the back, spray painted it for a nice, even color, and taped off some chevrons to add a little bit of color.


I did eyeball the chevrons so they're not great. I didn't want to become too obsessed with something that was going to be hidden behind pretty bottles of nail polish. While the pink was drying, I went out and spray painted my dowels. (Okay, so my dowels are really just bamboo skewers, but that's neither here nor there.)


After taking the tape off, I noticed some of my pink paint had seeped through. Oh butts. But then I went and raided my stash of paints to see what could work; I could smooth out the edge with a pinkish color, or just paint over it with white. Then, I saw this cute little bottle of brown paint -- the kind for fabric that always stays a little raised.

I grabbed a few backups (pink, silver, and white), but when I tested the brown, I loved it. And I realized I could do cute little chevrons to break up the large chunks, too. It was great. Again, my lines aren't perfect, but it's eyeballed.

I hot glued the back to the rest of the rack and started covering my edges with the ribbon that I had bought.

With some Velcro Command Strips, I stuck it to the side of my bathroom organizer and filled it with nail polish. All of the bottles in my room fit perfectly in there!

Added bonus: A few days ago, I stole a magazine rack from my garage that was literally just collecting dust. (I'm not kidding, it was pretty gross.) I cleaned it up, spray painted it white, and with the help of some Command hooks, I have a place to store my straightener and hair dryer that is neither on the floor nor in my way in the tiny cabinet under the sink.
Total cost for both of these projects: $2.50.
Foam board: Free, lying around the house.
Hot glue: Free, lying around the house.
Paints: Free, lying around the house.
Bamboo skewers: Free, lying around the kitchen drawer.
Ribbon: $1
Magazine rack: Free, lying around the garage.
Velcro Command Strips: Free, Nana gave them to me when she heard about this project.
Command Strip Hooks: $1.50 from Dollar General.
Are they perfect? No. Are they functional? Yes. Do I love them? Yes.
I promise I'm going back to regular crafts now that Junk-Free June is over with. Promise.
Wednesday, June 26, 2013
WIP Wednesday: DIY Nail Polish Rack, Part One

So I had this aha moment while cleaning up from my closet shelves. This little box seemed to be a strangely familiar size. It took me a bit to realize it was the same size as my bathroom storage shelves. Then, I had the wonderful idea of turning it into a nail polish rack.

I cut the box and made little shelves, fixed them with masking tape and covered the whole thing in layers of Mod Podge, hoping it would seal the tape in, and make the cardboard sturdier. I covered it with a few layers of spray paint, and ta da!
No, not really. The masking tape showed through pretty much no matter what. I tried more layers of paint, sanding it down to help level it out, and nothing seemed to work. So, I scrapped it and started over. I didn't feel too bad tossing it in the recycling bin since it was something I had salvaged anyway.
Take Two:
I noticed these spare pieces of wainscoting that were collecting dust in our garage. They were all left over from when we remodeled our kitchen, so I assumed them to be fair game. The only thing stopping me was that we didn't have a power saw. Thankfully, though, I have a loving boyfriend who does.I drew out a rough sketch of what I wanted, measured them on the board, and Zach was even kind enough to cut them for me. (I guess he was afraid of me losing a finger...) He also suggested that I paint the pieces before I try to assemble it, so I took it home and painted.
Once my layers seemed thick enough to cover the dark mauve color we have in the kitchen, I decided that I was done painting and I could start assembling. I had planned on using wood glue to hold it together, then going back over it with nails or staples. The only thing stopping me now was that we didn't have any wood glue.

I glued the long sides first, and realized that I could match up the lines on the wainscoting lined up great. Not to mention the fact that they are 2" apart, so I can use them for guides for my shelves.
When the glue dried, it was warped and both of the sides were tilted inward.

Take Three:
Whilst browsing YouTube for completely unrelated things, a DIY nail polish rack video showed up on the related videos. "I'll see how they did it," I told myself as I clicked it. It was a pretty good video, actually. She used foam board, which I happened to have two large sheets of from when I was thinking about my World of Warcraft cosplay.I kind of merged two tutorials. I took BluSuga's video tutorial and mixed it with the PaperCastle tutorial for the shelves. What I ended up doing was cutting slits in the sides and shelves so I could make them interlocking. I thought this would make it a little more stable. I took some panel board nails and reinforced them on the sides, then hot glued another side strip over it, just to make sure. I took it out and spray painted it white just to cover any imperfections.

Right now, I have the frame with it's rough foam board edges. I wanted to wait to make sure everything was glued and that I liked it before I cut the back. Once I get it done, I thought about doing a pink and white chevron design on it for just a pop of color since it will be against a white surface. I'm also going to add some white dowels to the front just to make sure the polishes don't slip out. I also plan on covering those rough edges with some ribbon that I picked up.

That's my WIP right now. Well, one of them at least. Hopefully this will be done soon and I can share with you it's awesome glory!
Monday, June 10, 2013
Musing Mondays: Organizational Optimism
My room is a horrible mess still from my upcoming WIP Wednesday in which I tell you about redoing my closet. I have things I still need to sort, find a place for, etc. Yes, that means I found something to delay my bag's progress even more, but I swear I will finish it eventually. Also, while cleaning out my closet I found a cute little cross stitch of a mouse with a thimble, needle, and thread which I had to start playing with as soon as I found it. Sigh. But it's tiny and shouldn't take long at all.
Though it may not look like it by my room, I'm on an organizing kick right now. I even started a new Pinterest board called "Get Organized!" but I haven't pinned much. Stupid closet, what have you done? Through cleaning my closet, I found some things I would rather fold than hang, but most of my drawers are full. I plan on cleaning one out that has mostly just nail polish and Bath and Body perfume in it.
Therein lies the problem, though: What do I do with all that junk? I started looking through nail polish organization through Google and Pinterest, but none of them were really something I could just make at home on a whim. (If you haven't noticed, I don't like spending more money than I have to.) Then it hit me. There was a small, rectangular box that some of the hardware for my closet came in. I grabbed it and ran to the bathroom and it was the perfect size to fit on the side of my cabinet above the toilet. I spent pretty much an hour working on cutting it, making little shelves, and taping it all down. So, there's another project I have going...
Then what do I do with the perfume?! I guess the best thing I could do would be to pick and choose which I like the most and have them more readily available. Then I can store the rest elsewhere. (I also don't like getting rid of things... Can you tell?) I like the idea of having them handy, but I also like the idea of having them in the closet. Hm...
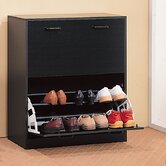
One of the last major storage issues in my closet is my shoes. I have a shoe rack-dresser-thing in my room like the one above that I got from Walmart, but that has more of flats, flip flops, and tennis shoes in it. I don't see how heels could fit in there. I have a container that rolls under my bed that I had stored shoes in previously (which I don't think I've gone through in at least five years). I finally went through them and weeded out the ones I wouldn't miss. I went through my heels to see which I liked the most and which got worn the most, then put the others in the storage under the bed. Hopefully I won't forget about them now. I bagged the old ones up and plan on taking them to Zach's little sister who wears the same shoe size as me; otherwise, I guess I'll take them to Goodwill. This narrows it down to about ten pairs that I want to keep in my closet.


I also want to make some of the cute little storage boxes to go on the top shelf. I say make because have you seen the price of those things? It's usually like $5 for one of them! I'm sorry, can I not buy packing boxes for cheaper than that, then cover it with something cute and be much more cost efficient? I want them so that my sweaters won't be all out in the open; I feel like that makes it look messier in there and I would much rather pull down a basket, find the sweater, and put the basket back up. If I have them organized by color like my closet is, it would be easy to find the sweater I wanted, too.

I also looked through a lot of blog planners online. I know...Why do I keep doing this to myself? I really like this blog and I think I've done a decent job of staying on top of it so far -- it's only been a month, but that takes dedication! I guess I'm just old fashioned in the fact that I still like to hand write things, especially when I'm organizing or planning something. I took most of the ideas from My May Sunshine's blog, but I played with it to fit my tastes a little more. (The one pictured above is the one My May Sunshine made. I haven't put mine together yet.) I also didn't include all of the pages she used, and I plan on looking around the web a little more to see if there are any others I would like to add. Once I get it all pretty and to my liking, I'll be nice and include it as a free download.
I also hit 600 page views on Saturday. Yay. I don't know why you guys are still in this for the long haul, but thanks! Let me know what you would like to see more of and I'll do my best to provide!
That's what I've been doing and what will probably keep me busy for a while... Even though my Nana just sent me home with about five skeins of yarn that I want to play with. As always, if you have any tips for me, please leave a comment with them as well as anything else you would like to share.
Be sure to check out my social media stuff to stay up-to-date! I finally got my Twitter and BlogLovin' accounts set up, so if that's more your style than Facebook, give me a follow.
What do you guys have planned for June?
Friday, June 7, 2013
Freebie Friday: Spice Up Old Heels

Alright girls, how many of you have an old pair of plain heels that you loved at one time, got on sale, or you never wear because they're plain and boring? Well, I don't even know how I came across it, but Maegan over at Love Maegan has a great tutorial for how to revamp those heels using those heels, fabric, and Mod Podge.
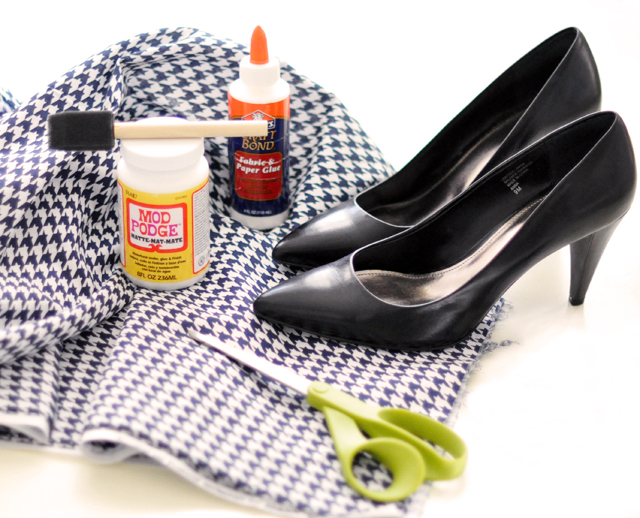
She turned her boring black heels into this:
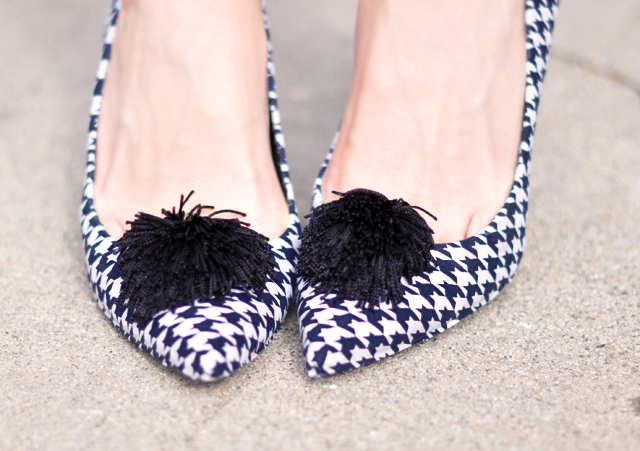
Of course, yours don't have to be hounds tooth or have the little pom pom at the toe, but it's a wonderful idea, in my opinion. And you probably have all of these materials at home already if you're a crafter. Here is her tutorial for this super shoe makeover.
 She also has a tutorial for making cute lace socks to wear with your heels, which I think is another great way to spice up your shoes. This is also a good idea if you're afraid of messing up a pair with Mod Podge!
Of course, she does have more than just shoe tutorials, but I stumbled into the shoe section and fell in love with her neat ideas! Before you throw your heels away, be sure to check how you can revamp them and fall in love with them all over again! Visit Love Maegan for all of her great tutorials.
*All of the photos in this post were from Love Maegan. I did not create any of these; all credit belongs to her.
Subscribe to:
Posts (Atom)

About Me

Hey. I'm Jeshi and I like to craft all kinds of things. Thanks to the wonders of the internet we DIY-ers can share our processes with others. Want to know more about me? Click here.