Follow Me


Popular Posts
-
A few years ago, I was introduced to the wonderful world of steampunk. If you haven't heard of it before, there are a multitude of re...
-
 I know, I said I might not have anything good for WIP Wednesday due to the slow going on the plarn hobo bag. I would like to add that I man...
 -
 My first question after reading the title would be "What on earth is plarn?" To be honest, I had no idea what plarn was a fe...
 -
Do you know how to knit, crochet, or both? I'm sure you've heard about the amazing website Ravelry , then. If you haven't, let...
-
Happy Labor Day! So, originally, I thought it was only going to be an interview on Tuesday. I spent the entire time from Friday until...


Grab My Button!
Like my blog? Take a button with you. Let your readers know you like to craft something, too!

<div align="center"><a href="http://letscraftsomething.blogger.com" title="Let's Craft Something!" target="_blank"><img src="http://farm4.staticflickr.com/3788/9046676023_899b0f9f44_o.png" alt="Let's Craft Something!" style="border:none;" /></a></div>
Showing posts with label plastic bags. Show all posts
Showing posts with label plastic bags. Show all posts
Wednesday, May 22, 2013
WIP Wednesday: Expeimenting with Plastic Bag Fusing
I know, I said I might not have anything good for WIP Wednesday due to the slow going on the plarn hobo bag. I would like to add that I managed to get a good deal done the other day while Zach was helping his brother with math. I'm about halfway done with the bulk of the bag, but it's really just double crocheting and doesn't look very impressive...yet.
So, I decided instead of posting some inspiration, I would actually try something I've been thinking about. When I first learned about plastic bag fusing, I was like "Okay, but what about if I wanted to add color to it? Can I dye the plastic in any way?" Honestly, the only places we have around here use either white or yellow bags. (Yay small towns!) Unless I want white, yellow, or black garbage bags, I need to figure out how to dye them.
I did a little Googling, but nothing was really helpful. Most things just said it was much easier to do using a bag that already had that color. Well, that didn't help at all. Someone had suggested spray painting, and at first I was completely against it. Then, as my search dwindled on, I thought that maybe, if you fused some plastic bags together, spray painted it, and then added more plastic over it to kind of seal the spray paint in, it may work.
I decided that it was worth a shot and grabbed the bag full of scraps from making plarn. I didn't want to use up all of my good, hole-less bags that I would use for my plarn on a theory, so I figured scraps would do just fine.
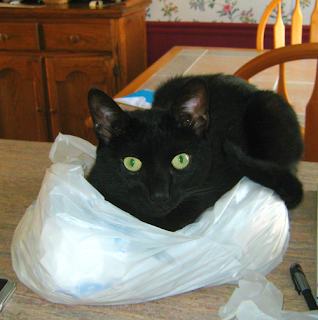
I had my handy little helper with me because he absolutely loves plastic Walmart bags.
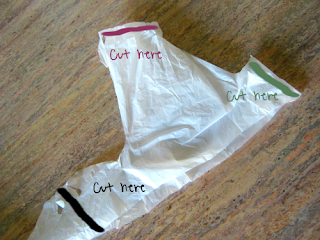
I used the handles since they were the biggest sections of bag that I had to work with. I cut them at the seams and down the center so I would have two large sections per bag. I just wanted to make something large enough that if it worked well, it wouldn't just be a fluke.
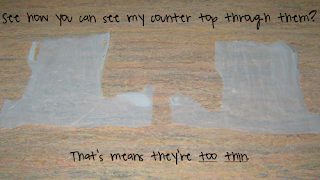
And I was left with four, thin, silly top hat looking pieces of bags. I knew they were going to be thin and probably not much stronger than regular bags if I didn't layer them. I cut about three bags like this so that I would have twelve thin pieces like this.
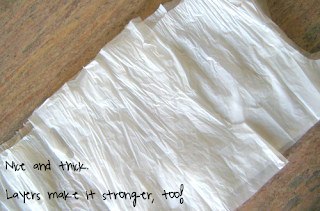
I took these pieces and layered them until I could not see the pattern of my counter through them. About twelve worked for me (3 bag handles total). Ever had a plastic bag break on you? Yeah, me too. That's another reason why layers are great -- more layers means it's stronger.
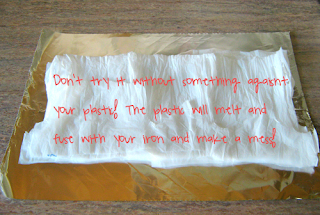
According to the internet, you can use aluminum foil or parchment paper to sandwich your plastic bags between. Since I'm cheap, I thought I would use aluminum foil for this run. It's just a small swatch I'm testing and parchment paper is more expensive.
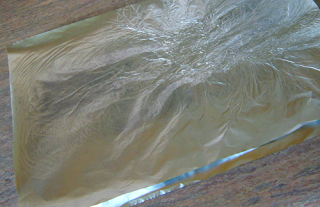
The biggest drawback to using aluminum foil is that you can't see the plastic as it's fusing. If you were actually making something with fused plastic, I would recommend using parchment paper so that you don't have to keep lifting the foil. I ironed for about ten minutes, flipping the foil about every two minutes. I used the second lowest setting on my iron; on this setting, the aluminum foil never got too hot to touch to flip it over.
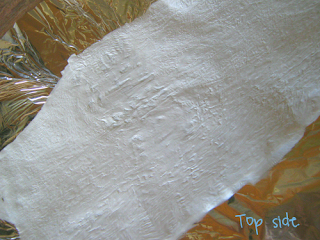
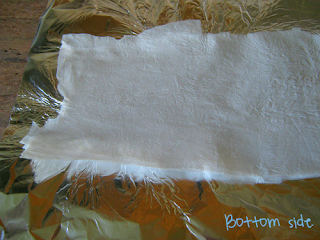
Everything I read said that bubbling is normal and that one side would look better than the other; it was also said that edges don't fuse well. I noticed all of these things with my first trail run. To me, the bottom side looked better and was less shiny. I found it neat that you couldn't see any of the seams or places where it overlapped unless I held it up to the light.

Then I took it out to the garage for a spray painting -- well, actually two of them as I did two coats. The only dark color I had happened to be black. I thought we had a dark purple, but I was wrong. I know, I know... If I wanted a black bag, I could use a trash bag. I was just testing things, remember!
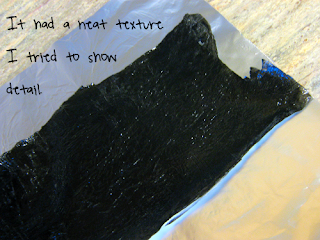
Now, what I thought would be wrong with using spray paint would be that it might dry and crack if you were to make anything out of it. This is where I had the idea of using another bag or two to seal the spray paint inside of the layers.
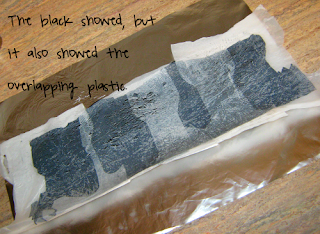
So, I layered one more thin layer of plastic over it to try to seal it in. Unfortunately, all I had were white Walmart bags. Since I was just trying to test a theory, I didn't worry too much about the overlap; it was just another part of the test. Turns out, the overlap is very obvious. If you were to patch them carefully together, it would just look like a lighter version of the color you painted.
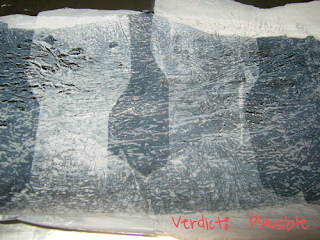
What's the verdict on this method of "dying" plastic bags? I'd say it's plausible. You have to be very, very careful with this method if you're going for a dark color. I don't think it would matter as much on lighter colors. Otherwise, try clear plastic bags for the top, outer layer.
Do you guys have any suggestions for how to dye plastic bags for fusing? Maybe I'll try again with something different sandwiched between the plastic. Hmm. Wait, no. First I have to finish my plarn hobo bag!


So, I decided instead of posting some inspiration, I would actually try something I've been thinking about. When I first learned about plastic bag fusing, I was like "Okay, but what about if I wanted to add color to it? Can I dye the plastic in any way?" Honestly, the only places we have around here use either white or yellow bags. (Yay small towns!) Unless I want white, yellow, or black garbage bags, I need to figure out how to dye them.
I did a little Googling, but nothing was really helpful. Most things just said it was much easier to do using a bag that already had that color. Well, that didn't help at all. Someone had suggested spray painting, and at first I was completely against it. Then, as my search dwindled on, I thought that maybe, if you fused some plastic bags together, spray painted it, and then added more plastic over it to kind of seal the spray paint in, it may work.
I decided that it was worth a shot and grabbed the bag full of scraps from making plarn. I didn't want to use up all of my good, hole-less bags that I would use for my plarn on a theory, so I figured scraps would do just fine.

I had my handy little helper with me because he absolutely loves plastic Walmart bags.

I used the handles since they were the biggest sections of bag that I had to work with. I cut them at the seams and down the center so I would have two large sections per bag. I just wanted to make something large enough that if it worked well, it wouldn't just be a fluke.

And I was left with four, thin, silly top hat looking pieces of bags. I knew they were going to be thin and probably not much stronger than regular bags if I didn't layer them. I cut about three bags like this so that I would have twelve thin pieces like this.

I took these pieces and layered them until I could not see the pattern of my counter through them. About twelve worked for me (3 bag handles total). Ever had a plastic bag break on you? Yeah, me too. That's another reason why layers are great -- more layers means it's stronger.

According to the internet, you can use aluminum foil or parchment paper to sandwich your plastic bags between. Since I'm cheap, I thought I would use aluminum foil for this run. It's just a small swatch I'm testing and parchment paper is more expensive.

The biggest drawback to using aluminum foil is that you can't see the plastic as it's fusing. If you were actually making something with fused plastic, I would recommend using parchment paper so that you don't have to keep lifting the foil. I ironed for about ten minutes, flipping the foil about every two minutes. I used the second lowest setting on my iron; on this setting, the aluminum foil never got too hot to touch to flip it over.


Everything I read said that bubbling is normal and that one side would look better than the other; it was also said that edges don't fuse well. I noticed all of these things with my first trail run. To me, the bottom side looked better and was less shiny. I found it neat that you couldn't see any of the seams or places where it overlapped unless I held it up to the light.

Then I took it out to the garage for a spray painting -- well, actually two of them as I did two coats. The only dark color I had happened to be black. I thought we had a dark purple, but I was wrong. I know, I know... If I wanted a black bag, I could use a trash bag. I was just testing things, remember!

Now, what I thought would be wrong with using spray paint would be that it might dry and crack if you were to make anything out of it. This is where I had the idea of using another bag or two to seal the spray paint inside of the layers.

So, I layered one more thin layer of plastic over it to try to seal it in. Unfortunately, all I had were white Walmart bags. Since I was just trying to test a theory, I didn't worry too much about the overlap; it was just another part of the test. Turns out, the overlap is very obvious. If you were to patch them carefully together, it would just look like a lighter version of the color you painted.

What's the verdict on this method of "dying" plastic bags? I'd say it's plausible. You have to be very, very careful with this method if you're going for a dark color. I don't think it would matter as much on lighter colors. Otherwise, try clear plastic bags for the top, outer layer.
Do you guys have any suggestions for how to dye plastic bags for fusing? Maybe I'll try again with something different sandwiched between the plastic. Hmm. Wait, no. First I have to finish my plarn hobo bag!
Wednesday, May 15, 2013
WIP Wednesday: Crochet Plarn Hobo Bag

My first question after reading the title would be "What on earth is plarn?" To be honest, I had no idea what plarn was a few weeks ago. I was looking up some stuff on embroidery when I saw something about fusing plastic bags together. I thought that sounded pretty neat, and then I saw that you could somehow make plastic bag yarn, or plarn, to knit and crochet with.
Yarn out of something that I already have a ton of? Why not give it a try? I mean, if I mess up, it's not like I spent money on supplies.
I was pretty skeptical, to be honest. I mean, they're plastic bags. They rip easily when you put too much weight in them, so how could they be that great for knitting or crocheting? As skeptical as I was, I figured I would try it. A lot of people had been doing it already, so there had to be some reason behind it...

I found a super simple tutorial on how to make plarn on a blog called Gooseflesh. The only downside is that it takes a little while to make because you want to be careful not to rip the bags. Her measurements are all in centimeters, but it works out to where approximately 2.5cm is an inch.

If you just want the gist of how she makes plarn, here's the quick textual version. Basically, what she does is fold the bags in half (hotdog style), and again, and again, until her strip is about an inch wide. Then she cuts off the bags at the seams at the bottom and the handle. From there, she cuts the bags into 2cm sections. After you open up the sections of bags, you knot them together and ta-da, double stranded plastic yarn, or plarn.
When I cut my sections of bags, I usually go with an inch width just because it is easier for me. Like this, I can get 12 sections of bags from one bag. This ends up making about a 216 inch section of plarn (with each section being about 18 inches).
Another great thing about plarn is when you reach the end of your plarn string, just add more to it. I've done this probably three times while working on my bag so far.

I only have the base of my bag done right now, but I have already used about 9 bags already. (I'm estimating because I still have some plarn on my homemade spool of a toilet paper roll.) I'm only using Walmart bags right now, mostly because that's what our supply is pretty full of, but also because I like the white color with hints of blue that it puts off.

Ultimately, I'm hoping to get some yellow Dollar General bags to make flowers with also for the finished product. I feel like it would compliment the colors well and really make it look less like recycled bags.

One thing I have learned, though is to be very careful with your knots. They can tear the plarn if you try to force them through. This is why it's important for you to get the knots as small as possible when making your plarn. If you leave bigger knots and get into some tighter stitches, you could end up with the same problem that I did. Learn from my mistakes!
Have you worked with plarn before? What are your thoughts on it? Would you ever consider using it? Fused plastic bags before? What do you do with your plastic bags? Leave a comment and let's get upcycling!
Subscribe to:
Posts (Atom)

About Me

Hey. I'm Jeshi and I like to craft all kinds of things. Thanks to the wonders of the internet we DIY-ers can share our processes with others. Want to know more about me? Click here.