Follow Me


Popular Posts
-
A few years ago, I was introduced to the wonderful world of steampunk. If you haven't heard of it before, there are a multitude of re...
-
 I know, I said I might not have anything good for WIP Wednesday due to the slow going on the plarn hobo bag. I would like to add that I man...
 -
 My first question after reading the title would be "What on earth is plarn?" To be honest, I had no idea what plarn was a fe...
 -
Do you know how to knit, crochet, or both? I'm sure you've heard about the amazing website Ravelry , then. If you haven't, let...
-
Happy Labor Day! So, originally, I thought it was only going to be an interview on Tuesday. I spent the entire time from Friday until...


Grab My Button!
Like my blog? Take a button with you. Let your readers know you like to craft something, too!

<div align="center"><a href="http://letscraftsomething.blogger.com" title="Let's Craft Something!" target="_blank"><img src="http://farm4.staticflickr.com/3788/9046676023_899b0f9f44_o.png" alt="Let's Craft Something!" style="border:none;" /></a></div>
Showing posts with label steampunk. Show all posts
Showing posts with label steampunk. Show all posts
Wednesday, September 11, 2013
WIP Wednesday: Everyday I'm Bustling

Alright, I know I promised a new theme and here it is: Steampunk September! While I suppose I should have been using it on my starfi -- wait, I can say it now -- Staryu headpiece, I didn't want to use it before September began.
Steampunk September is named as such because of our upcoming anime convention. Instead of dressing as traditional anime characters or the like, we enjoy steampunking. It's the one weekend a year I get to lace up in my corset without people pestering me with questions about it hurting/being uncomfortable/etc. (By the way, corsets are not uncomfortable to me; in fact, they help my posture and my back.) Also, I rather enjoy alliteration.
That being said, I began sewing this week. I found a full sized bed sheet in this pretty buttery color. It was $1.95 at a thrift shop. It wasn't until I got it home, however, that I noticed a large splotch of yellow marker on it, too. It kind of made me wonder if the sheet was originally yellow, but whatever.
The yellow sheet was made into a full-length skirt; I used elastic for the waist band because it would be hidden underneath my corset. I want to make another skirt in blue to go on top of it. The blue skirt would be bustled.

I thought that the hem of the sheet itself would be great for the hem of the skirt; I wouldn't even have to do anything to it!

Then, I noticed that if I doubled it over, the elastic for the waist would fit inside well, so I decided to use it as my waistband instead. I doubled it over, sewed it together, and sewed a top stitch to make a little channel for the elastic.

For my bottom hem, I rolled it up about a centimeter, ironed it to make a little pleat, then rolled it up another centimeter for a small hem. The stitch is along the top of the hem.

I won't bore you with all the details; it's a simple, two panel skirt. If anyone needs help with figuring out how to do one, I'd happily help. It's a freaking rectangle, after all, but i wanted it to be long and rather straight.

Here is a close-up of my elastic channel. You can see the stitches where the bed sheet was orignally hemmed. If it were something that would show, I would take a darker thread (or maybe even white) and sew some zig-zags between the two hems at the bottom for decoration.

Of course, I can't do anything without at least a little help from this Booger. He worked well in weighting my fabric down so I could pin it.
This idea is for my Steampunk Misty cosplay. I'm not that into showing off my legs, and there is no way I would be seen in public wearing a belly shirt and short shorts. Sorry. So, when I thought of steampunking her, I envisioned the yellow of her belly shirt, the blue of her shorts, and the red of her suspenders. I knew there were also different version of her outfits throughout the series.
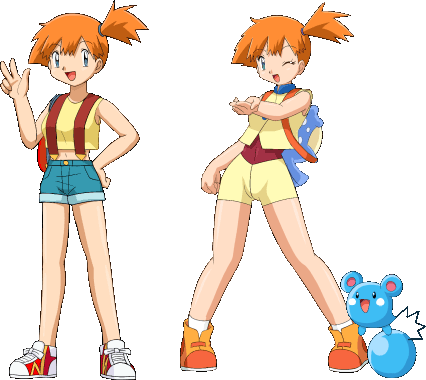
In case you are unfamiliar with Pokemon, here are some images of Misty throughout the games and anime.
The yellow color is not only representative of the shirt, but it is also close enough a skin tone that it could also represent skin. The blue bustle is obviously representative of her short shorts. My corset is red, which is for her suspenders. This is for the middle Misty, which is from the anime. It could just as easily be for the Misty on the right.
I am also considering making a jacket for this ensemble, though I haven't decided the color. Any suggestions?
Also, I have been toying around with the idea of dying the yellow either with tea or brown dye just to darken it up a little. It seems pretty buttery and bright to me. What do you think?
I know some of this is hard to envision because all you have to go by is the bed sheet skirt, but it will come together! I promise!


Wednesday, July 24, 2013
WIP Wednesday: The Headpiece
This is what I was planning on posting last week when I had that terrible day-long migraine.
Do you remember my Freebie Friday that was about making your own porcelain dough? Well, there was a reason that I shared that with you all; I had recently searched for it for an upcoming project/costume. I'm still afraid to spoil the surprise because I think it's pretty original and awesome. I'll hopefully be posting some of Zach's as we work on his. I don't know if Heather and Mike are going to be sharing any of their photos.
So, consider this the beginning of my hints. I decided to work on a headpiece that will hopefully make my character a little more recognizable as herself. We're steampunking the original characters, and Zach was a little afraid she wouldn't be as recognizable in the garb, so I'm trying to take extra effort to incorporate things associated with her. I know this sounds really cryptic, but I hate to just reveal it and ruin the surprise for those who don't know! Bear with me, please.
First, I made the dough. I didn't have enough for the complete recipe, so I halved it and so far I have plenty. It took maybe half the ball to make this much.

I tried drawing a template for the starfish, but it always ended up looking wonky, so I scrapped it and tried using a star cookie cutter. It looked even worse, so I free-handed one. Amazingly enough, it worked! And it looked pretty darn good, if you ask me.

I baked it for an hour in a 170 oven (which is as low as my oven goes) and left the door cracked. I took so many precautions because I really didn't want this little guy to crack.

I let the oven cool for maybe another hour to where I wouldn't have to use a potholder -- mostly because I was afraid rapid temperature changes would crack him -- and sat him on top of the oven. I let him sit there for about 2 more hours to make sure he was good and dry.

After raiding our paints, I found a buttery yellow acrylic paint and did a nice few coats with a paintbrush. After that dried, I took a toothbrush with a chocolate paint to give nice, coarse strokes.

I let the brown dry and then used the toothbrush to flick yellow specks on him. Unfortunately, in my attempts to make it even, I accidentally did more than I liked. So, I let him dry again and painted a light layer of brown with my fingertips. That allowed for some little streaks and covered the bright yellow compared to the chocolate color.
I liked how the layering of the specks under the brown gave him a more porous effect. I wanted to press a sponge into him before baking, but it didn't quite work out. He dried quicker than I thought and it ended up just mushing him, so I decided I'd try to achieve that with paint.
He's not quite done yet. I still have another layer or two of dough to put and bake on there, but he's coming right along! I feel like this was the hardest part of my pretty little headpiece and the rest should fall in place easier.
Sorry about the image quality... I just took the images that I uploaded to Instagram and posted them here. I've had an unfortunate case of not-being-able-to-look-at-the-computer-screen-too-long due to my headaches. I've also been unusually tired. Maybe I need to get blood work to see if I need to up my Synthroid dosage...again. Sigh.
Anyway, that's your clue for the week as to my costume! I'm not going to say yes or no to any guesses, either! Hopefully it will get to be glaringly obvious for those of you in the anime/video game fandoms.
Do you remember my Freebie Friday that was about making your own porcelain dough? Well, there was a reason that I shared that with you all; I had recently searched for it for an upcoming project/costume. I'm still afraid to spoil the surprise because I think it's pretty original and awesome. I'll hopefully be posting some of Zach's as we work on his. I don't know if Heather and Mike are going to be sharing any of their photos.
So, consider this the beginning of my hints. I decided to work on a headpiece that will hopefully make my character a little more recognizable as herself. We're steampunking the original characters, and Zach was a little afraid she wouldn't be as recognizable in the garb, so I'm trying to take extra effort to incorporate things associated with her. I know this sounds really cryptic, but I hate to just reveal it and ruin the surprise for those who don't know! Bear with me, please.
First, I made the dough. I didn't have enough for the complete recipe, so I halved it and so far I have plenty. It took maybe half the ball to make this much.
I tried drawing a template for the starfish, but it always ended up looking wonky, so I scrapped it and tried using a star cookie cutter. It looked even worse, so I free-handed one. Amazingly enough, it worked! And it looked pretty darn good, if you ask me.
Before baking...
After baking!
After raiding our paints, I found a buttery yellow acrylic paint and did a nice few coats with a paintbrush. After that dried, I took a toothbrush with a chocolate paint to give nice, coarse strokes.
I let the brown dry and then used the toothbrush to flick yellow specks on him. Unfortunately, in my attempts to make it even, I accidentally did more than I liked. So, I let him dry again and painted a light layer of brown with my fingertips. That allowed for some little streaks and covered the bright yellow compared to the chocolate color.
I liked how the layering of the specks under the brown gave him a more porous effect. I wanted to press a sponge into him before baking, but it didn't quite work out. He dried quicker than I thought and it ended up just mushing him, so I decided I'd try to achieve that with paint.
He's not quite done yet. I still have another layer or two of dough to put and bake on there, but he's coming right along! I feel like this was the hardest part of my pretty little headpiece and the rest should fall in place easier.
Sorry about the image quality... I just took the images that I uploaded to Instagram and posted them here. I've had an unfortunate case of not-being-able-to-look-at-the-computer-screen-too-long due to my headaches. I've also been unusually tired. Maybe I need to get blood work to see if I need to up my Synthroid dosage...again. Sigh.
Anyway, that's your clue for the week as to my costume! I'm not going to say yes or no to any guesses, either! Hopefully it will get to be glaringly obvious for those of you in the anime/video game fandoms.
Wednesday, July 10, 2013
WIP Wednesday: Steampunk Costuming Resources Needed
Guys, I'm going to be honest with you. I got my days mixed up somehow. Somewhere between Sunday and today, I lost a day. I've been thinking I had an extra day to work on my WIP Wednesday post. I guess I really need to instill that blog planner I made a few weeks back, huh? I wish I could say that I got busy and lost track, but that would be a lie.
Something I've been wondering for about a year now (and I posted on the Facebook page) is if there is any sewing pattern for a corset cover out there? I spent more money than I'm really willing to say on this beautiful corset a few years ago. It's terribly comfortable, though starting to get a little big since I've lost some weight.

While I love the beautiful pattern and fit, I would like a little more versatility available in my costuming. Because I don't want to spend a large amount of money like that on another corset, I wondered if there was a way to make a temporary cover for it -- kind of similar to those removable reupholsterings.
My friend Heather suggested I just make a new one, but the complexity behind them scares me a little. I can sew and follow a pattern, but I'm no seamstress. Even some simple things scare me sewing related...much less boning and panels? I do have a pattern for corsets, though so I may give it a try...
Since I'm asking for any ideas on corset-related items, I may as well ask for other steampunk ideas any of my readers may have. I feel like I have a hard time picking out costumes that will look good on me because I am a bigger girl. All the ones I see are beautiful, but wouldn't fit right on me. For example, I had kind of envisioned a steampunk lolita, which is what the photo above was supposed to be.
Costume, hair, makeup, anything. Throw me some suggestions. I'm always up for trying new things costume-wise. If you do post suggestions, I'll do my best to try them and post the results. (Oh dear, this could be dangerous with hair and makeup...)
But, I really am working on this:

I'm sorry for blowing you guys off for a book. In my defense:

Next week, I promise I'll have more of a WIP Wednesday post and not just some silly little filler like this. :) I am truly sorry for forgetting my days.
Something I've been wondering for about a year now (and I posted on the Facebook page) is if there is any sewing pattern for a corset cover out there? I spent more money than I'm really willing to say on this beautiful corset a few years ago. It's terribly comfortable, though starting to get a little big since I've lost some weight.
It was a prop flask and it was empty to begin with, thank you very much!
While I love the beautiful pattern and fit, I would like a little more versatility available in my costuming. Because I don't want to spend a large amount of money like that on another corset, I wondered if there was a way to make a temporary cover for it -- kind of similar to those removable reupholsterings.
My friend Heather suggested I just make a new one, but the complexity behind them scares me a little. I can sew and follow a pattern, but I'm no seamstress. Even some simple things scare me sewing related...much less boning and panels? I do have a pattern for corsets, though so I may give it a try...
Since I'm asking for any ideas on corset-related items, I may as well ask for other steampunk ideas any of my readers may have. I feel like I have a hard time picking out costumes that will look good on me because I am a bigger girl. All the ones I see are beautiful, but wouldn't fit right on me. For example, I had kind of envisioned a steampunk lolita, which is what the photo above was supposed to be.
Costume, hair, makeup, anything. Throw me some suggestions. I'm always up for trying new things costume-wise. If you do post suggestions, I'll do my best to try them and post the results. (Oh dear, this could be dangerous with hair and makeup...)
But, I really am working on this:
I'm sorry for blowing you guys off for a book. In my defense:
Next week, I promise I'll have more of a WIP Wednesday post and not just some silly little filler like this. :) I am truly sorry for forgetting my days.
Wednesday, June 5, 2013
WIP Wednesday: Plarn Hobo Bag Update and a June To-Do List
Do you ever start a project and realize about halfway through that you wish you hadn't? That's kind of how I feel about my plarn crochet bag. I mean, I love it. I think it looks neat so far and it's a great way to upcycle those annoying plastic bags you get when you go to the grocery store. The only reason why it is taking me so darn long to finish is because it takes me pretty much the same amount of time to make the plarn as it does to crochet it! Not to mention that I have come to the part in the pattern where I have to double crochet; that's when I learned that one of the strips of bags is about two double crochets with a size K (6.5 mm) hook.
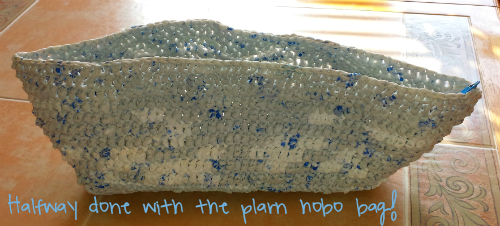
I'm almost done with the bulk of the bag. I lack less than ten rows, then I have to do the strap, and any decoration that I may put on there. This bag is becoming the bane of my existence. It just sits there, staring at me, taunting and pleading with me at the same time.
Also, oops. I went to put clothes away yesterday and realized my closet is horrible. Like, terrible. I don't think I can describe in words how badly organized my closet was. So, I decided to redo it, but that is a post for another day. Yes...I have found something else to put off that stupid bag.

While I keep putting that off, I keep coming up with new things to add to a list of to-do projects. For example, I told Zach that, for our anniversary I was going to make him one of those "three wolf moon" shirts, but with Benni, his/our German Shepherd. That's not to say I am not getting him the best gift with it, also. I'm still working on getting the colors to look right... Like, getting all the dogs to look the same. (Not that it's going to matter as much when it's transferred onto a t-shirt, but whatever.)
After that, he's asked me to make him a quiver for his arrows, since he got back into archery. I thought that didn't sound too hard... All you have to do is sew a cylinder with an open end. So we'll see how that goes.
Then I wanted to work on my steampunk jetpack out of plastic bottles... And...and... Phew. All of this can get a little crazy. Good thing I have you guys here to keep me straight. Okay, here's the priority list:

I'm almost done with the bulk of the bag. I lack less than ten rows, then I have to do the strap, and any decoration that I may put on there. This bag is becoming the bane of my existence. It just sits there, staring at me, taunting and pleading with me at the same time.
Also, oops. I went to put clothes away yesterday and realized my closet is horrible. Like, terrible. I don't think I can describe in words how badly organized my closet was. So, I decided to redo it, but that is a post for another day. Yes...I have found something else to put off that stupid bag.

While I keep putting that off, I keep coming up with new things to add to a list of to-do projects. For example, I told Zach that, for our anniversary I was going to make him one of those "three wolf moon" shirts, but with Benni, his/our German Shepherd. That's not to say I am not getting him the best gift with it, also. I'm still working on getting the colors to look right... Like, getting all the dogs to look the same. (Not that it's going to matter as much when it's transferred onto a t-shirt, but whatever.)
After that, he's asked me to make him a quiver for his arrows, since he got back into archery. I thought that didn't sound too hard... All you have to do is sew a cylinder with an open end. So we'll see how that goes.
Then I wanted to work on my steampunk jetpack out of plastic bottles... And...and... Phew. All of this can get a little crazy. Good thing I have you guys here to keep me straight. Okay, here's the priority list:
- Plarn hobo bag
- Three Benni Moon shirt
- Quiver
- Jetpack
Wednesday, May 29, 2013
WIP Wednesday: More of a Theory than an Actual WIP
Sorry, guys, but I don't have anything really to show you. I know what you're thinking... "She got distracted by Skyrim that much again?!" No, I promise it's a much more legitimate reason than that. My cat seems to have developed a UTI; I noticed frequent bathroom -- well, litterbox -- trips Sunday night and didn't think anything of it. Instead of sleeping with me like he normally does, he slept by my bathroom, near his litterbox. His frequent trips continued on Monday, and I checked because normally, his pee clumps are pretty big. There was hardly anything. I did some quick research online because it was a holiday and my vet was obviously off. I discovered it was probably a UTI and gave him canned food instead to make sure he was getting water. Anyway, I took him to the vet Tuesday morning and they gave him a shot and some antibiodics for me to continue with. I'm having to keep a close eye on him to make sure there are no changes. I'm also pretty paranoid when it comes to my little baby, so I've been pretty distracted.
However, when I went to get cat food, I grabbed a two liter to keep by my desk for when I game. I also had two one liter bottles sitting around because I'm lazy and hadn't taken them out yet. I had toyed with the idea of steampunk jetpack before when I was planning a steampunk Rainbow Dash cosplay, but never quite got around to making it.
 | |
| This is the one that I thought about basing my Rainbow Dash jetpack on. |
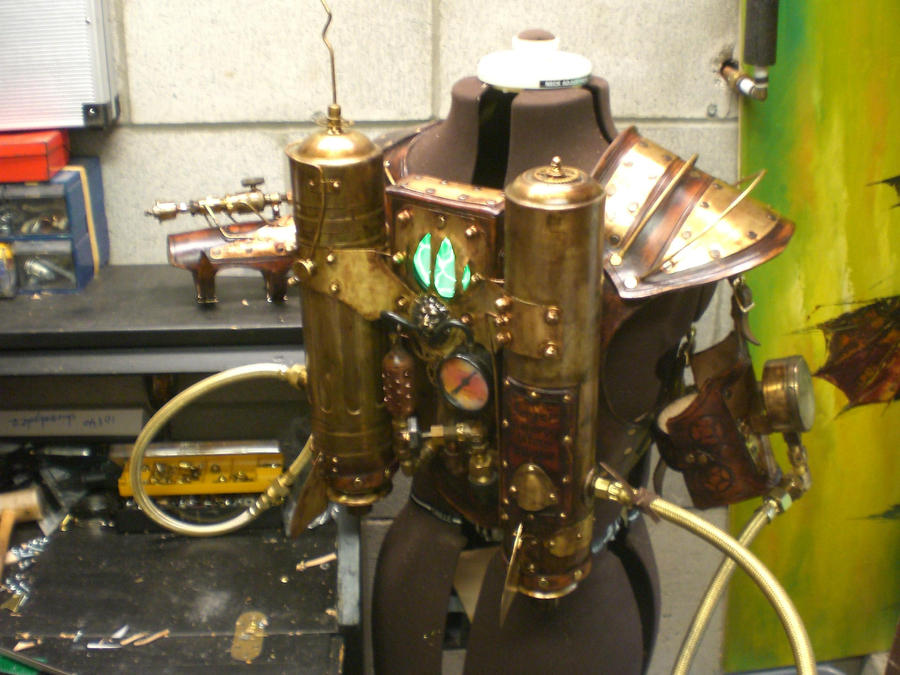 |
| Found on DeviantArt by Skinz-N-Hydez who does amazing costume work. |
I could always go for something a little more ambitious and realistic. But I have no job and I don't want to drop a lot of money on something like a costuming prop. Not to mention i have nowhere to put it!
So there is my conceptual WIP. If you have and ideas to add, sketches, or reference images for me, feel free to link them! I'd be more than happy to check them out. I've also gotten the links page working a little better already. (Remember, I said this website would be a bit of a WIP for a while, too?) Sorry this post didn't have something a little more tangible; as I said, I'm worried about my little Booger and getting him feeling better.
Tuesday, January 1, 2013
Duct Tape Top Hat Tutorial
During our last AWA trip, I saw this beautiful top hat that I thought would look amazing on my boyfriend. What I didn't realize, however, was the price. It was a beautiful leather top hat in green and brown. I even made him try it on. In the end, though, it wasn't worth the $250 and we went home without it.

One day, I was skimming through new craft websites, as I am prone to do, and stumbled across Cut Out and Keep. I did a search for steampunk out of curiosity and ran across a tutorial for a Duct Tape steampunk top hat. Her finished product is shown below along with a different version that followed the same pattern:


It's beautiful, but at the same time, it is much too feminine for him. It also used a preexisting top hat, which we didn't have. It mentioned using a plastic party top hat that could be purchased from somewhere like Party City, but I didn't want to make the trip and risk making a hat that was too small for his head. I also didn't like the lines where the Duct Tape began and ended being so visible as it is in the original product.
I did some searching and found a few YouTube tutorials on making a Duct Tape top hat from scratch -- well, Duct Tape. My best find was a Dr. Seuss Cat in the Hat top hat tutorial found here.
After looking through the tutorials and watching the video, I decided it was due time I began. When I finally stopped procrastinating, I got it done in time for Christmas.

If you want your very own Duct Tape top hat, I've included a tutorial. I'm anxious to see how other Duct Tape top hats turn out! To learn how to make your own (or see how I did it) click here.
Subscribe to:
Posts (Atom)

About Me

Hey. I'm Jeshi and I like to craft all kinds of things. Thanks to the wonders of the internet we DIY-ers can share our processes with others. Want to know more about me? Click here.