Follow Me


Popular Posts
-
A few years ago, I was introduced to the wonderful world of steampunk. If you haven't heard of it before, there are a multitude of re...
-
 I know, I said I might not have anything good for WIP Wednesday due to the slow going on the plarn hobo bag. I would like to add that I man...
 -
 My first question after reading the title would be "What on earth is plarn?" To be honest, I had no idea what plarn was a fe...
 -
Do you know how to knit, crochet, or both? I'm sure you've heard about the amazing website Ravelry , then. If you haven't, let...
-
Happy Labor Day! So, originally, I thought it was only going to be an interview on Tuesday. I spent the entire time from Friday until...


Grab My Button!
Like my blog? Take a button with you. Let your readers know you like to craft something, too!

<div align="center"><a href="http://letscraftsomething.blogger.com" title="Let's Craft Something!" target="_blank"><img src="http://farm4.staticflickr.com/3788/9046676023_899b0f9f44_o.png" alt="Let's Craft Something!" style="border:none;" /></a></div>
Friday, June 21, 2013
Freebie Friday: Organizing with What You Have

As you guys may have noticed, I don't like to spend more money than I have to. Generally, that means that those fancy drawer organizers are out the window. (I do have them in the kitchen, though.) I haven't been on this DIY organization for very long, but my family isn't so great about throwing things away that we could find use for later.

When I saw these cute little confetti painted tumbler glasses, I kept thinking of how familiar they were and realized that we had glass candle holders stowed away that had the same shape. I pulled them out and cleaned them really well before heading to my bathroom with them.

As you can see, I haven't bothered with painting them...yet. (But who knows now that I know it works well.) The top shelf and the top of my shelves were horrid before this. I took the basket from our "junk room" because it wasn't being used. I have some lesser used hair products in there, as well as a container of makeup brushes, a make up bag, and some Vaseline in the basket. I also have my brush and an air freshener up top. On the top shelf, I have one glass candle holder for bobby pins and hair clips, the next is for my hair elastics, then a candle my neighbor gave me for my birthday, a candle holder for my Qtips, and a mason jar styled candle holder for cotton balls. The baskets are from Dollar Tree, I think.
This is just one example of ways that you can organize from things you probably have lying around the house. There are tons of things that you can find online using household items to organize with. For example:
Do you eat soup? Yes? Clean the cans, cover with some pretty paper and BAM! Organization cubbies.

What about cereal? Do you eat cereal? Cut them down, cover them with some pretty paper and BAM! Drawer organization.

Shoes! You have to wear shoes. Guess what? Cover those shoe boxes with some pretty paper and BAM! Storage.

These were just a few of the suggestions that I found through the I Heart Organizing blog. If you need some organizing tips or inspiration, I would definitely recommend checking them out.

And if that's still not enough for you, here's "Top 58 Most Creative Home-Organizing Ideas and DIY Projects". Many of them I've seen before, but they're still pretty good ideas.

What's your favorite DIY organization method? Do you have any suggestions that need to be added?
Conquer that clutter!


Wednesday, June 19, 2013
WIP Wednesday: The Closet Calamity Continued
I know you guys are probably already tired of hearing about my closet catastrophe, but I'm determined to clean the clutter and open up to organization this month! That's right. These things have been slowly driving me crazy, but I'm going to get them done so that I can move on to more important and more enjoyable things! (Like maybe finishing that stupid plarn bag...)
So when we last left off with the closet, I had just installed my new shelves and hung my clothes back up. Which was still amazing, but those darned sweaters that were folded at the top of the shelving unit was driving me insane. Though they were folded, it still looked sloppy -- which makes sense because bulky sweaters usually don't like stacking nicely on one another.
You may have remembered me talking about wanting to put baskets up, but complaining about how expensive they were. After poking around on Pinterest for a while, I ran into several dollar store crafts. I took it as a sign and ran over to our local Dollar General. (I wish we still had our Dollar Tree, but oh well.) I spent a while debating their clear plastic totes, which isn't quite what I wanted, but almost settled for. I turned around and the best thing jumped out at me.

A hanging closet. I know, I know. I was going for horizontal space, not vertical. The dimensions were absolutely perfect if I turned it on its side. Four feet long, twelve inches high, and twelve inches deep. It was the exact amount of space that I had on the top shelf.

The only drawback was that it was made almost entirely out of cloth and looked like it would have fallen on its own. But alas! Only two shelves down were plastic clothes hangers. I picked them up, judged the size, and decided I could easily cut them down and use them as plastic supports.

About an hour and $6 later, ta da! A brand new sweater shelving unit that all of my folded sweaters easily fit into -- even the bulky ones! (You know, for the maybe three days that it snows in Alabama...)

While I was at Dollar General, I also bought a picture frame. Intending to keep my walls mostly clear, I thought my closet would be the perfect place for one of those chicken wire jewelery holders. Again, this was another Pinspired craft, but it was set in motion when I saw chicken wire at Zach's house in their garbage left over from building their chicken coop.
A frustratingly long time later (because I had to go with the cheap picture frame) and $8 later, I had a new chicken wire picture frame to hang my jewelery on.
I daresay I'm nearly done with my closet. The last big hurdle there is my shoes...still.
Monday, June 17, 2013
Musing Monday: Junk-Free June!
.png)
I've been kind of reflective of why this whole organization spree begun. Once or twice a year, I do get into the habit of organizing, but it's usually on a small scale. I normally end up tackling only one area, such as my dresser. This time, though, I've started purging and organizing nearly everything in my room -- and it's starting to spread to the rest of the house.
Why has this happened? Why is this so much different than the other times? One theory I have is that I finally realized how terribly bad my closet was, which made me realize how bad my room was, and so on. My second theory is that I realized it would make for some decent blog posts; although I like to think that isn't truly the case, I do realize that I have made several small projects from one large one. A third theory I toyed around with was that maybe, just maybe, I was finally making the transition to adulthood. I mean, you never really see adults with totally junky rooms, do you? The last theory I thought of was that maybe I realized that I'm going to be leaving home soon and it would be easier on me then if I went through my stuff now.
Is it any one of these? Maybe. Who knows? I've never been a terribly organized person when it comes to my living space. As long as I can get around and know where things are, I've been okay with it in the past. It could be any combination of these theories, or even something I hadn't thought of.
Whatever the reasoning, psychological or not, I've decided that this June is going to be "Junk-Free June!" I realize we're halfway through it the month already, but so far I've spent my month going through my old things, de-cluttering and organizing. "Junk-Free June" just seems to make sense. Oh dear, I hope this doesn't turn into the "Summer of Storage"...
So far in June I have:
- Cleaned out my closet and installed new shelves. (I promise, I'll stop talking about it soon...)
- Rearranged the contents of my drawers, including emptying my nail polish, perfumes, and lotions from one drawer for clothing use. (Now they're just sitting in two shoe boxes on my floor...)
- Cleaned out from underneath my bed. (So much dust!)
- Rearranged my bathroom storage -- though I still don't have wall storage, I make do with what I can. (Coming up on Freebie Friday.)
- Emptied and restocked my nightstand.
- Made a chicken wire picture frame jewelery organizer for use in my closet.
- Begun working on a nail polish rack.
- Gone through a "junk drawer" in my desk -- which pretty much consisted of throwing away old guides for anime conventions.
- Gone through a "junk drawer" in the kitchen.
- Gone through our DVD collection (around 260 of them) and organized by genre; intend on putting them in a binder in the living room.
- Compiled a large pile of donation items -- mostly clothing.


Nana made me cute rice bags with tea in them. The owl has cloves and the cat has peppermint!
In my going through my room, I've noticed that it's not an overabundance of clothes that is causing the clutter -- it's an overabundance of stuff. Yeah, the clutter in my closet was mostly shoes and clothes, but outside of that, it's just stuff. Just to give you an example, I've found three pairs of craft scissors in my bedroom alone and a ridiculous amount of pens. I had several notebooks beside my bed that I would use to jot things down when I couldn't sleep and things were on my mind. Each of these notebooks has maybe ten or less pages in them before they are empty. I'm removing all but one in hopes to actually empty a few notebooks.
It's hard for me to come to terms with not needing some things anymore. I hate to admit that because it's like the first step to admitting to being a hoarder, but it's true. There are things I like to hold on to for what once was sentimental value (for example, the convention guides from five years ago...) or for thinking that I could use it for something (like an old foundation container or this random pile of floppy disks on my desk).
I've been having a hard time sleeping this past week, but I think it's due to knowing there have been large piles on my bed. If I do somehow manage to forget, I'm reminded when I try to adjust in my sleep and can't due to piles of yarn or clothes. Maybe it's just knowing that there are piles of things that need to be put away, or simply that there is something that I could be getting done. Whatever it is, it's annoying and needs to stop. I was still awake and going when the sun came up several days.
Now I'm going back through my organization spree posts and tagging them with "Junk-Free June" and adding the nice banner to the top. I wish I had taken "before" shots of my room so that you would be able to tell how much of a difference my organization has made, but, again, I didn't expect it to turn into the month-long project that it has.
Friday, June 14, 2013
Freebie Friday: Blog Planner!
Remember how I said I was making a blog planner that I could use? Well, I got it pretty much finished. I say "pretty much" because I feel like it's something I'll always be tweaking to some extent. Seeing as I don't have sponsors, I don't have the need right now for a sponsors and expenses page as many blogging planners featured.


This is a 12 page download including a title page, table of contents, blog ideas page, blog to-do page, blog improvement page, monthly calendars, weekly planners, post planners, and blog stats. More may be added later. This file is in a Word document so that you can easily edit its contents to match your needs and likes.
Feel free to download it and edit as you see fit. I just wanted one that fit my style a little more and included a few things. If you improve upon it and don't mind sharing it with me, please do. Mine was just made in Word (again, for right now).
If you want to download it, here is the link. Enjoy your blog planning!
Wednesday, June 12, 2013
WIP Wednesday: The Case of the Crazy Closet
Warning: What you are about to see is a horrible mess that I am ashamed of. Please do not judge me based upon the state of this closet!
You know those projects that you don't plan and you cannot plan for? The projects that just run at you like some kind of harlot and demand that you do them next? That was my closet.
I was going to put away some clothes that had just been washed and hung up when the monstrosity that was my closet reared its head and told me, "Not today" (like I was the god of death or something). It was a combination of things that made my closet horrible: the floor was cluttered with shoes, clothes that had fallen off the hanger, and things I was too lazy to put away, so I just kicked it in the closet.


Another thing that didn't help was the fact that this particular closet has not been remodeled or anything since about 1985 when my parents bought the house. (I wish I was joking, but I'm not.) In retrospect, I should have just sucked it up and redid the closet when I moved into this room, but I didn't. The closet itself is tiny -- about 55" deep and 44" wide -- so in such a small space, having as much room to store things is essential. If I weren't a pack rat this would have been a lot easier.
As soon as I decided that I was going to remodel my closet, I put on jeans and ran to Home Depot. After probably an hour at debating the different, cheap wire shelves with a wonderfully helpful associate named Kristen, it came down to a numbers game. I had looked at an $89 kit that was made for four to six foot closets. I, however, prefer the cost efficient method to the time and effort efficient; I will do the extra work if it means saving $20. Kristen offered to give a rough estimate for how much it would be outside the kit. She quoted doing it completely yourself at around $120, so I bought the kit.
I actually stared having regrets when I started pulling everything out of my closet. I started with the floor and it wasn't so bad until the large cardboard box I had gotten for the shoes in there began to overflow. After I got all of my clothes out, it looked like my closet had projectile vomited onto my bed.


I trudged on, however, and learned just how bad my closet was. Remember when I said the closet hadn't been touched since at least 1985? The wire shelves were sticky and when I looked at my hands I had flakes of black stuff and mystery glitter all over them. That's not the worst part, though. The shelves weren't cut properly or something and they were held together in the corner by zip ties. Zip ties! Most of the screws weren't even serving any purpose since many of the hooks had long since broken off.


That was just the shelves. The walls looked terrible, too. Aside from all the holes, it was obvious that this closet hadn't seen love in a while. The paint was that "white a long time ago" color; I guess I could call it vintage white now haha. There were scuffs all along the bottom where shoes had been kicked against the wall without a care, places where the paint had chipped off, and something where I guess someone had tried to attach something... I don't even know. It was a mess -- a hot mess.

My next step was trying to cover all the holes and dents in the walls. This was a chore by itself, not to mention sanding the plaster! In the end, I didn't much care if it was perfect because it is just a closet after all, so there are still ridges where the plaster was. It's not a huge deal because I also plan on using as much of the space as possible and many of them will end up being covered up.


While the plaster was drying, I took the baseboards off and gave them a nice, white coat of paint. These are the baseboards that I remember from my childhood. We've updated the rest of the baseboards in the house to match the more modern style, but again, it's a closet.
After all the plaster had dried and was sanded as best it was going to get, I took a dinner break, then went to see Zach for a few hours. When I came home, though, I put on my first coat of paint. We had bought a very, very light blue to do on a ceiling -- but then we realized how hard ceiling painting was and decided against it. With a whole gallon of it just sitting in the garage, I opened it up and rolled it on.
Since it was already about 1 a.m. and I still had to wait for that coat to dry, I just called it a night, played some Skyrim and slept on the couch. (My bed was occupied by all the clothes, remember?)
I woke up early -- for me at least -- and got started with my second coat and touch ups. It wasn't long before that was dry, so I went ahead and nailed in my baseboards and did some touch ups. It's not a big deal or anything, but when doing white baseboards, I like to paint over the nails -- seeing the white interrupted by a dot of silver and knowing it's a nail head always bugs me. Plus, my hammer had scuffed up a few places.

It wasn't perfect, but it was beautiful. This crisp, light blue color that reminds me of clean laundry, freshly painted baseboards to match, and all this room! I laid in the floor looking up to the ceiling for a while, just reveling in how much I had already accomplished. Once you get to a milestone like that, it's hard for me to pick back up. I took a long break, including making lunch and a gallon of tea, before I started back.

This seems like the best $89 I have spent in a while. The box is an impenetrable fortress, though! Seriously, I spent so much time fighting with that stupid box. Knowing that all of the shelves and things were metal, I considered lighting it on fire to open it; then I remembered the instructions and little plastic bits. Tip for manufacturers: don't glue your boxes completely shut.
The kit, thankfully, was much easier than opening the box. The only thing that took me a while was sawing the tracks because my closet is an awkward 55" deep. I know I could have probably used something a little better than a hacksaw, but it's what the instructions recommended and I really didn't want to break anything.

After following the instructions, ta da! I had a new set of shelves and what felt like a lot more room in my closet. It was about 24 hours from the idea to remodel my closet to the time that I started loading my clothes back into it.

Is it completely finished? No. I still have some storage needs (such as shoes), but it's a great start and it's oh so much better! Not only that, but I did it completely by myself -- paint, assembly, everything. Thanks, ClosetMaid!
Monday, June 10, 2013
Musing Mondays: Organizational Optimism
My room is a horrible mess still from my upcoming WIP Wednesday in which I tell you about redoing my closet. I have things I still need to sort, find a place for, etc. Yes, that means I found something to delay my bag's progress even more, but I swear I will finish it eventually. Also, while cleaning out my closet I found a cute little cross stitch of a mouse with a thimble, needle, and thread which I had to start playing with as soon as I found it. Sigh. But it's tiny and shouldn't take long at all.
Though it may not look like it by my room, I'm on an organizing kick right now. I even started a new Pinterest board called "Get Organized!" but I haven't pinned much. Stupid closet, what have you done? Through cleaning my closet, I found some things I would rather fold than hang, but most of my drawers are full. I plan on cleaning one out that has mostly just nail polish and Bath and Body perfume in it.
Therein lies the problem, though: What do I do with all that junk? I started looking through nail polish organization through Google and Pinterest, but none of them were really something I could just make at home on a whim. (If you haven't noticed, I don't like spending more money than I have to.) Then it hit me. There was a small, rectangular box that some of the hardware for my closet came in. I grabbed it and ran to the bathroom and it was the perfect size to fit on the side of my cabinet above the toilet. I spent pretty much an hour working on cutting it, making little shelves, and taping it all down. So, there's another project I have going...
Then what do I do with the perfume?! I guess the best thing I could do would be to pick and choose which I like the most and have them more readily available. Then I can store the rest elsewhere. (I also don't like getting rid of things... Can you tell?) I like the idea of having them handy, but I also like the idea of having them in the closet. Hm...
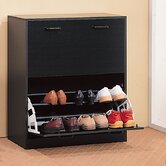
One of the last major storage issues in my closet is my shoes. I have a shoe rack-dresser-thing in my room like the one above that I got from Walmart, but that has more of flats, flip flops, and tennis shoes in it. I don't see how heels could fit in there. I have a container that rolls under my bed that I had stored shoes in previously (which I don't think I've gone through in at least five years). I finally went through them and weeded out the ones I wouldn't miss. I went through my heels to see which I liked the most and which got worn the most, then put the others in the storage under the bed. Hopefully I won't forget about them now. I bagged the old ones up and plan on taking them to Zach's little sister who wears the same shoe size as me; otherwise, I guess I'll take them to Goodwill. This narrows it down to about ten pairs that I want to keep in my closet.


I also want to make some of the cute little storage boxes to go on the top shelf. I say make because have you seen the price of those things? It's usually like $5 for one of them! I'm sorry, can I not buy packing boxes for cheaper than that, then cover it with something cute and be much more cost efficient? I want them so that my sweaters won't be all out in the open; I feel like that makes it look messier in there and I would much rather pull down a basket, find the sweater, and put the basket back up. If I have them organized by color like my closet is, it would be easy to find the sweater I wanted, too.

I also looked through a lot of blog planners online. I know...Why do I keep doing this to myself? I really like this blog and I think I've done a decent job of staying on top of it so far -- it's only been a month, but that takes dedication! I guess I'm just old fashioned in the fact that I still like to hand write things, especially when I'm organizing or planning something. I took most of the ideas from My May Sunshine's blog, but I played with it to fit my tastes a little more. (The one pictured above is the one My May Sunshine made. I haven't put mine together yet.) I also didn't include all of the pages she used, and I plan on looking around the web a little more to see if there are any others I would like to add. Once I get it all pretty and to my liking, I'll be nice and include it as a free download.
I also hit 600 page views on Saturday. Yay. I don't know why you guys are still in this for the long haul, but thanks! Let me know what you would like to see more of and I'll do my best to provide!
That's what I've been doing and what will probably keep me busy for a while... Even though my Nana just sent me home with about five skeins of yarn that I want to play with. As always, if you have any tips for me, please leave a comment with them as well as anything else you would like to share.
Be sure to check out my social media stuff to stay up-to-date! I finally got my Twitter and BlogLovin' accounts set up, so if that's more your style than Facebook, give me a follow.
What do you guys have planned for June?
Subscribe to:
Posts (Atom)

About Me

Hey. I'm Jeshi and I like to craft all kinds of things. Thanks to the wonders of the internet we DIY-ers can share our processes with others. Want to know more about me? Click here.